From font outline to 3D mesh: how Text Studio 3D builds letters
How Text Studio 3D turns TrueType and CFF outlines into solid letters: flattening, holes, constrained Delaunay caps, bevel rings, chisel normals and quality limits.

A font does not contain 3D letters. It contains outlines, closed curves that a rasterizer fills with pixels. To get real 3D text with depth in Unity, those outlines have to become a closed triangle mesh with front and back caps, side walls and bevel rings, shaped well enough to survive relief and deformation and built fast enough to change at runtime.
I built Text Studio 3D, and these are my notes on its geometry pipeline, from the curves in a TrueType or CFF font to the cached geometry a player build reuses. Where a step changed recently, the version is named.
How a font outline becomes a 3D text mesh
Every result passes through the same stages, in this order:
- Text and shaped glyph outlines from the active text backend
- Layer selection and contour construction
- Front and back caps, then relief
- Bevels, then the body or shell
- Depth shaping and sweeps
- Contour programs and decorations
- Deformation
- Surface mapping and materials
- Mesh assembly and output
The 3D side never picks its own font. TextMeshPro or UniText decides typography, shaping and fallback faces, and Text Studio 3D asks for the outlines of exactly the glyphs the backend resolved. Font3D is matching technical data for outline access, not a second font picker.
Quadratic and cubic outlines
TrueType outlines are made of quadratic Bezier curves, with one control point between two points on the curve. OpenType fonts with CFF outlines use cubic Bezier curves with two control points, the curve type of PostScript fonts. Text Studio 3D reads TrueType and CFF1 outlines, including bold and italic faces and fallbacks, and both formats go through the same flattening and cleanup code, so they produce the same kind of geometry.
Variable TrueType fonts use their default instance. CFF2, color-only fonts, dynamic OS fonts and atlas-only font assets have no outlines Text Studio 3D can use and need an imported outline source.
Flattening with an error tolerance
Triangles have straight edges, so every curve becomes a polyline first. The flattening splits a curve in half, again and again, until its control points lie within a tolerance of the straight chord between its ends. A Bezier curve never leaves the hull of its control points, so the polyline stays within that tolerance of the true outline: straight stems get few points, tight bowls get many.
The tolerance is a quality decision. The mesh-detail presets Draft, Balanced, High and Hero set it together with bevel rings, cap and relief subdivisions, body steps, decoration detail, contour tubes and depth-sweep sampling, and Curve Detail sets it directly when Authored Detail is Custom. A finer tolerance means more geometry and more work, which is why the benchmark fixes it at 0.02 em for Text Studio 3D and UniText 3D alike.
Contours, holes and winding
A glyph is a set of closed contours. An O has two, the outer shape and the counter, the hole in the middle; a B has three. Fonts tell outer contours from holes by their direction, but the conventions differ between formats (TrueType runs outer contours clockwise, CFF counterclockwise), and many fonts, variable fonts in particular, contain overlapping contours that a rasterizer simply fills.
Text Studio 3D therefore does not rely on direction alone. It merges each glyph’s flattened contours with the nonzero fill rule, the rule font rasterizers use, which removes overlaps and sorts the result into outer outlines and holes. Holes become counters with their own inner surfaces, and counter bevels belong to the Inner Walls material region, so the inside of an O can take a different material from its outside.
Caps: why a constrained Delaunay triangulation
The caps are the front and back faces of a letter: the flattened outline with its holes, filled with triangles. How they are filled matters more than it seems, because later stages work on those triangles. Relief lifts their vertices, refinement subdivides them and deformers bend them.
Before 1.2.0, caps came from ear clipping or LibTess. Ear clipping cuts one triangle at a time off the boundary and tends to leave fans of long, thin triangles. LibTess can replace several collinear boundary segments with one long edge, along the stem of an F for example, which leaves T-junctions where the cap meets the side wall. Thin slivers are harmless on a flat face and a problem as soon as relief, refinement or a deformer moves their vertices.
Since 1.2.0, every cap goes through a constrained Delaunay triangulation first. Constrained means every outline edge stays an edge of the mesh; Delaunay means that, within those constraints, the triangulation maximizes the smallest angle, so slivers are avoided wherever the outline allows. It keeps every boundary vertex, so the cap meets the side walls and bevel rings exactly. The triangulation comes from Clipper2, the open-source polygon library that ships with Text Studio. Ear clipping and LibTess remain only as fallbacks for outlines the triangulator rejects, such as self-intersecting paths. The switch also builds inflated caps faster, and glyph geometry prepared with earlier versions regenerates.
Relief and chisel normals from the exact distance gradient
Face relief shapes the cap itself. Flat keeps the source face, Chisel carves a faceted surface, Inflate makes a smooth crown, and an engraved face cuts into the letter. Relief moves each cap vertex by an amount that depends on its distance from the outline, so a chiseled letter rises toward ridges along the middle of each stroke.
Lighting depends on normals. A chiseled face is made of planes that meet at those ridges, and each facet slopes along the direction to the nearest edge of the outline, which is the gradient of the distance. Before 1.2.0, Text Studio 3D estimated that gradient from four distance samples per vertex. Since 1.2.0, chisel faces take their normals from the exact distance gradient, and geometric normals take over only where the gradient is ambiguous, such as right on a ridge. The shading follows the authored relief rather than the triangles underneath.
Bevel rings from profiles
A bevel is the transition between the cap and the side wall. Text Studio 3D describes it as a profile, a curve from the ring where the bevel meets the body, at (0,0), to the cap plane at (1,1). The generator samples that curve into rings: each sample is a copy of the outline, offset by the profile’s radial value and moved by its depth value, and strips of triangles join neighboring rings. The runtime uses the resolved samples, not the curve, so a profile builds the same rings every time.
Corners follow the join type. Miter keeps them sharp but can extend far at acute angles, Round adds curvature and needs more detail, and Bevel cuts the corner, which stays stable for graphic shapes. Smooth Angle controls normal continuity, not the bevel’s width.
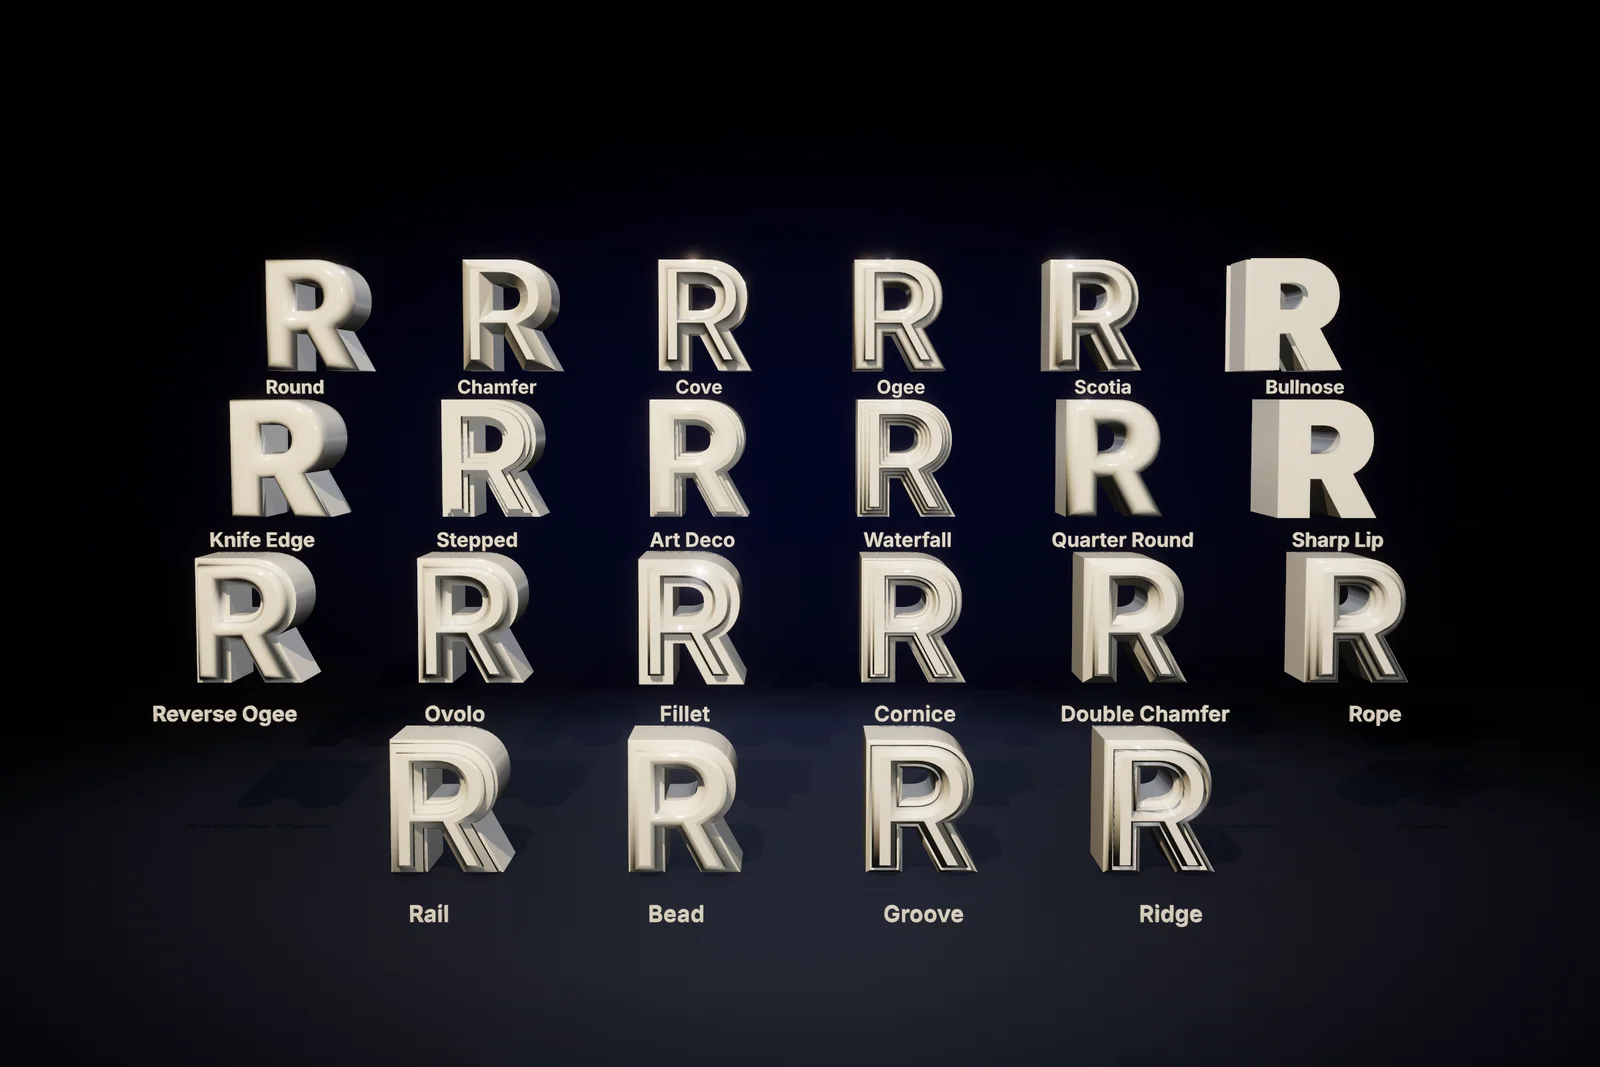 The letter R in all 22 built-in bevel profiles.
Any built-in profile can be edited in the Bevel Profile inspector, down to how many rings each span between anchors emits.
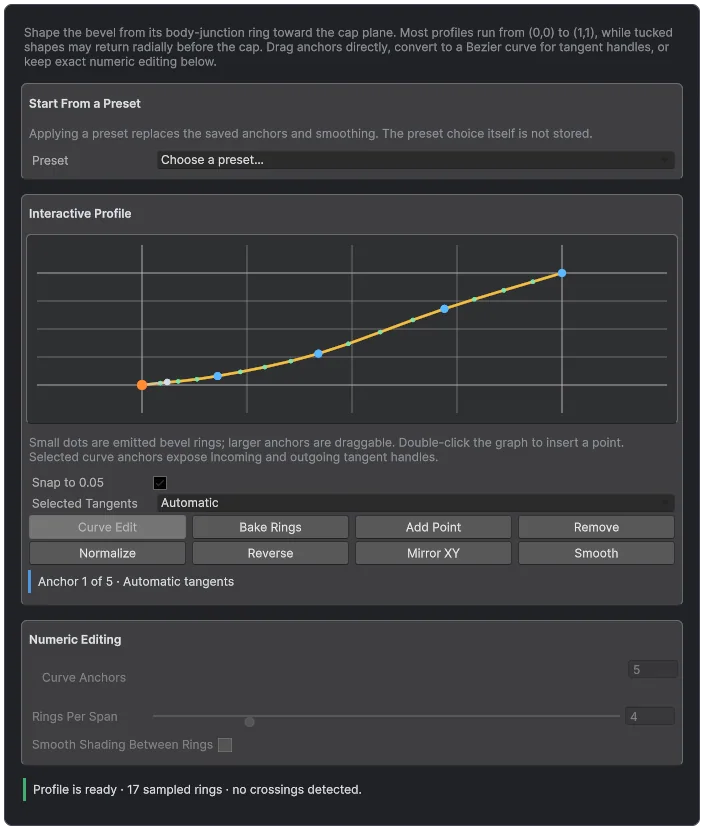 The Bevel Profile inspector: anchors are draggable, the small dots are the rings the generator emits, and the status line checks the sampled rings for crossings.
Body, depth and deformation
Between the bevels, the body carries the outline through the depth set by Body Depth. A straight body needs few cross-sections; bending, banking, rolling, scaling and deforming it need more, and Minimum Rings controls how many are available, for example for a sweep along a quadratic Bezier path or a Unity Splines spline. Deformers such as Bend, Twist, Wave and Cylindrical Wrap act last, on the finished geometry, which is one more reason the caps need well-shaped triangles.
 The generated mesh of SOLID over the shaded letters: caps, bevel rings and side walls.
Layer stacks: several solids per letter
A 3D Style is an ordered stack of geometry layers, and each layer is a complete solid with its own contour, depth, bevel and material: a fill, a stroke, an offset outline, a shell or a contour. The cover image shows SOLID built from three of them, labeled Shadow, Trim and Hero Gold.
Stack places a layer behind the depth of the one before it, which builds physical signs from front to back; Overlay starts a new depth chain at the front plane. A resolver coordinates bevel ends across a stack, so neighboring layers do not all build coincident end geometry. Outlines and strokes are real offset geometry built from the glyph contour, not a second copy of the text.
Word, Line and Whole Text layers merge the selected contours into one shape for connected outlines and fitted backings, but the group depends on the complete wording and is rebuilt when it changes, so changing text such as a score is cheaper with per-glyph layers.
Quality limits in pixels and degrees
New text starts at Balanced detail; Draft suits shaping, High close readable text and Hero final capture.
Since 1.3.0, Automatic Quality works with explicit limits: Surface Error in pixels for the largest on-screen displacement you accept, and Normal Error in degrees for the shading change. You define up to two reduced detail levels, and Text Studio 3D uses one only when it can certify that the visible error stays inside the budget; Authored Detail remains the ceiling. Certification currently covers straight, solid extrusions with closed faces and no bevel, contour expansion, trim or extrusion path, and other styles keep the authored mesh. LOD Group output stores the authored mesh plus those reduced levels for distance-based detail.
Caching and prepared geometry
Building geometry is the expensive part, so Text Studio 3D builds as little as it can. Reusable glyph geometry stores raw topology, and placement, surface mapping, materials, supported deformation and runtime visual channels are applied afterward, so compatible objects share one expensive base without sharing their look. On a straight solid layer even Body Depth is applied after retrieval, so one prepared shape serves every depth.
For player builds, Runtime Preparation (Tools > Text Studio > Runtime Preparation) saves that geometry ahead of time in a reusable library. Coverage is tracked per resolved glyph, by Unicode scalar, glyph index, fallback face and shaped identity, so ligatures and fallbacks prepare the geometry the backend will actually request. Prepared only forbids surprise generation in a player and validates the exact visible text before a build. Since 1.4.0, Prepare this text also stores exact static titles, including grouped word outlines and settled snow or frost, while reveals, tags and events stay live.
Where to read further
The Shape Faces, Edges, and Depth chapter documents every cap, bevel and body setting, and Choose Output and Performance covers detail presets, Automatic Quality and caches. For the practical side, start with 3D text with depth. Other tools take their own routes: UniText 3D also builds beveled solids with its own engine, while Modular 3D Text builds letters from its own font format without bevels.
Frequently asked questions
Which font formats can Text Studio 3D turn into 3D meshes?
TrueType and CFF1 OpenType outlines, including bold and italic faces, fallbacks and rich-text font changes. Variable TrueType fonts use their default instance. CFF2, color-only, dynamic OS and atlas-only fonts need an imported outline source.
Why does Text Studio 3D triangulate caps with a constrained Delaunay triangulation?
Because later stages move cap vertices. Relief, cap refinement and deformers need well-shaped triangles, while ear clipping left long slivers and LibTess could leave T-junctions at the cap rim. Since 1.2.0, every cap is triangulated with a constrained Delaunay triangulation first, which keeps every outline vertex and avoids slivers.
Which mesh detail preset should I use?
Draft while shaping and arranging, Balanced for ordinary real-time text, High for close readable text and Hero for final capture or very close presentation. Finer detail means more triangles and more build work.
Can I export the generated mesh?
Yes, as OBJ, with Export Current Mesh as OBJ in the component's context menu. For lightmaps, import that OBJ with Generate Lightmap UVs enabled in Unity's model import settings. To keep a finished title in the scene as static geometry instead, use Freeze Current Appearance in the Static Output section.
Real 3D text for Unity, built from your TextMeshPro text.
Keep reading
 Use case
3D text with depth in Unity: extrusion and bevels
TextMeshPro letters are flat and vanish when seen from the side. Text Studio 3D builds solid letters from the real font outlines, with bevels, layers, relief and a material for every surface, at the mesh detail you choose. Comparison
Text Studio 3D vs Modular 3D Text
Modular 3D Text costs less, supports Unity 2020.3 and has a mature 3D UI kit. Text Studio 3D adds bevels, layered materials, 111 styles and 29 native 3D effects to the TextMeshPro text you already have. Article