Settings
Use this section to configure what and how should be indexed. Indexing can be started and stopped at any time and will pick off again where it last stopped.
Actions
All features are separated into actions. Using the Run Actions command will run all selected ones at once. Each action can also be triggered individually. They will be executed from top to bottom.
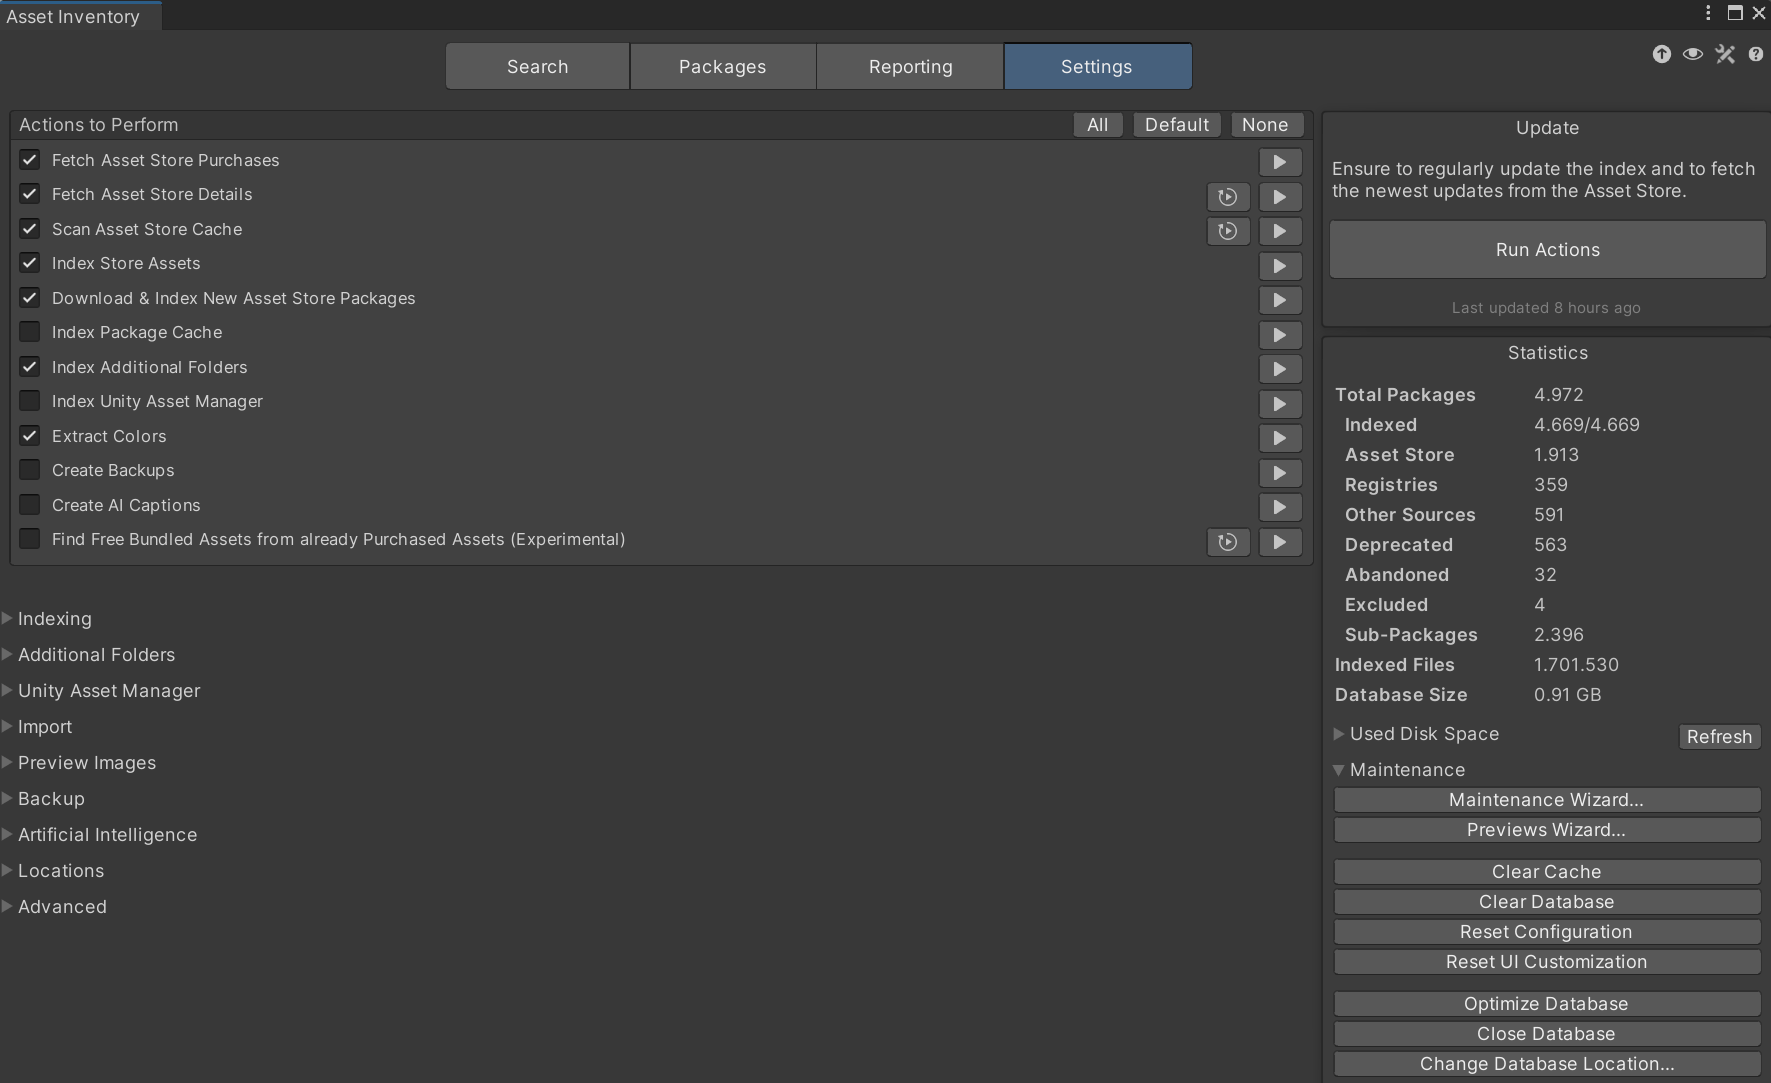
Indexing the Asset Store cache is activated by default and the main source for your data. There are two options available:
Index everything that is already downloaded into the local cache.
- That means you only need to click the Download button in the Package Manager window or right in the Asset Inventory for each asset you own (without importing them) to make them available for the index (bulk selection is also possible).
- If you have specified a custom asset cache directory in Unity 2022.1 or higher, it will typically be auto-detected. Press CTRL to see the resolved path and verify. You can manually override the location by switching the Asset Cache Location to Custom. If the environment variable ASSETSTORE_CACHE_PATH is set it will override the default asset cache location.
Automatically download purchased assets for indexing and delete them again afterwards.
- With this option you will index everything you have without the need to download everything, saving a lot of disk space, at the expense of a potentially very long indexing due to all the necessary downloads.
Nearly all actions are incremental, meaning you can interrupt and restart these at any time and they will mostly continue where they left off.
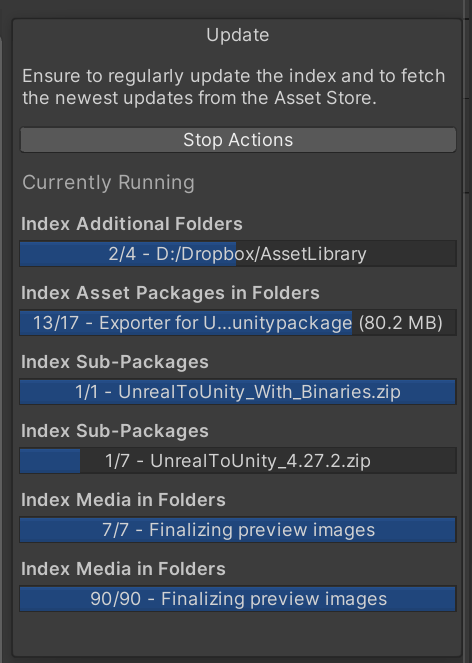
Once an asset is indexed it does not need to remain on your hard drive if you just want to search for it. Only when importing, it needs to be available.
If an asset is still scheduled to be indexed or a new version was downloaded, an indicator will appear in the version column. In that case run the actions and it will automatically index all remaining packages.

 Custom Actions
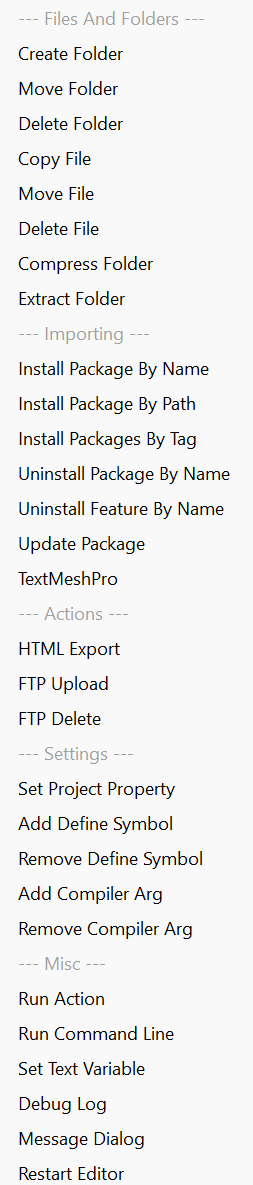
 In addition to the predefined actions it is possible to define your own ones. These can have any number of steps. Use the buttons at the bottom of the actions list to add or remove actions.
When selecting an action, you can run it individually using the Play button at the end. Or you run all steps with the Save & Run command at the bottom.
An important setting is what to do in case of errors. This can be defined for the whole action.
There are two run modes available:
- Manual: Execute the action manually from the UI or as part of the currently selected actions
- At Installation: In addition to manual, the action will bring up a dialog after the initial installation of the tool in a new project to be automatically run.
In addition to your own variables, many predefined variables can be accessed. These have the naming scheme “group.value”. You can look up the possible values in the linked documentation below.
Available predefined variables:
- Application (e.g. Application.dataPath)
- SystemInfo (e.g. SystemInfo.deviceName)
- Environment (e.g. Environment.MachineName)
- Config (e.g. Config.exportFolder)
- DateTime (e.g. DateTime.Now)
- PlayerSettings (e.g. PlayerSettings.companyName)
- EditorApplication (e.g. EditorApplication.applicationPath)
- QualitySettings (e.g. QualitySettings.maximumLODLevel)
- Screen (e.g. Screen.height)
- BuildTarget
Local Folders
If you want to index Unity packages downloaded from other sources, simply add the folders to the additional folders list. When selecting an entry from the list of additional folders, more options can be specified on the right-hand side. This way it is possible to select what types of files should be searched for:
- Unity Packages: Finds any .unitypackage files in the folder and indexes the content.
- Development Packages: Finds any package.json files and treats those as local packages.
- Media Files: Allows to index all kinds of other, free-floating assets, like images, models, audio libraries etc. Also Unity projects can be indexed this way.
- Archives: Will extract archives (zip, rar, 7z) on the fly and index all contents.
The order in which additional folders are processed can be changed by dragging them up or down in the list. Deactivating or removing an additional folder entry will not remove it from the index.
In root folder mode, the name of the additional folder will become the package name. If first or second level directories is selected, a new package for each identified subdirectory will be created.
If you remove an additional folder setting, the indexed data will still remain.
If you rename an additional folder or move it somewhere else, you can use the settings button to point the entry to the new valid location. Otherwise your index would be broken. You can also rename the folder right there as well instead of going to the file system.
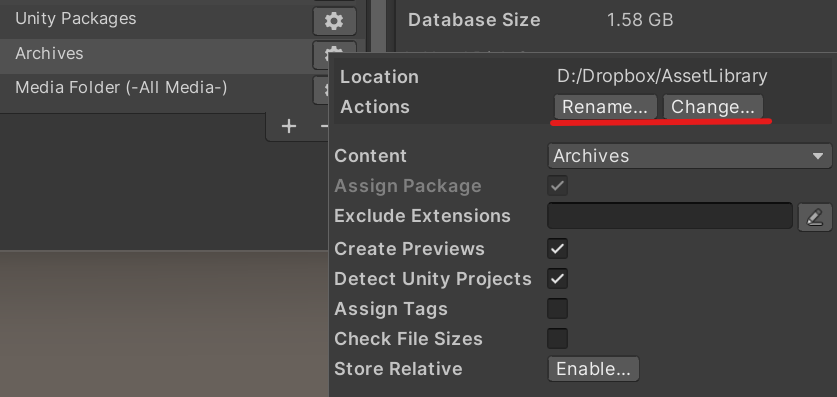
The options are only available in advanced mode so make sure to click the eye icon before.
Previews
The search result will show previews of the assets. These previews can come from three sources:
- Included in the package and created at the time the asset was built (state: pre-provided)
- This is done by the Asset Store tooling and the reason why e.g. previews for sound files can look different depending on which version of Unity was used.
- Sometimes these previews can be empty when exported incorrectly.
- Created by Asset Inventory during import (state: recreated)
- This happens automatically for atomic assets without dependencies, e.g. sound files, textures or models.
- Created by Asset Inventory on-demand (state: recreated)
- This mode can also create previews for prefabs and materials but will take much longer since all dependencies need to be materialized first.
It is possible to recreate a single preview from inside the search view, all previews for a package or perform recreation for missing previews in the complete database. There is a Preview Wizard to help with all steps. Previews can also easily be switched between provided and recreated there in case of issues, e.g. incompatible render pipelines.
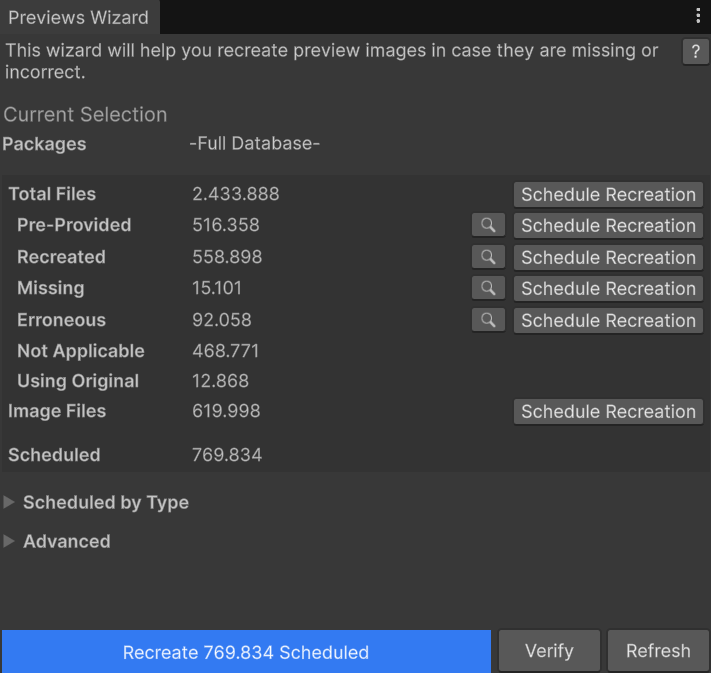
Preview file generation will work by temporarily copying each file into the current Unity project, letting Unity create a preview and removing it again. While creating previews it might happen that a new folder called _TerrainAutoUpgrade will appear under Assets as a side-effect. This process will take a bit of time but will allow Asset Inventory to show preview images and also additional meta data for many file types.
Image files will be handled separately for common file types, bypassing Unity, which is much faster and will, if active, automatically scale preview images to a higher resolution already during indexing.
Image verification is a recommended additional step after preview creation to detect if a preview was correctly created or e.g. the materials are pink due to the wrong SRP in use.
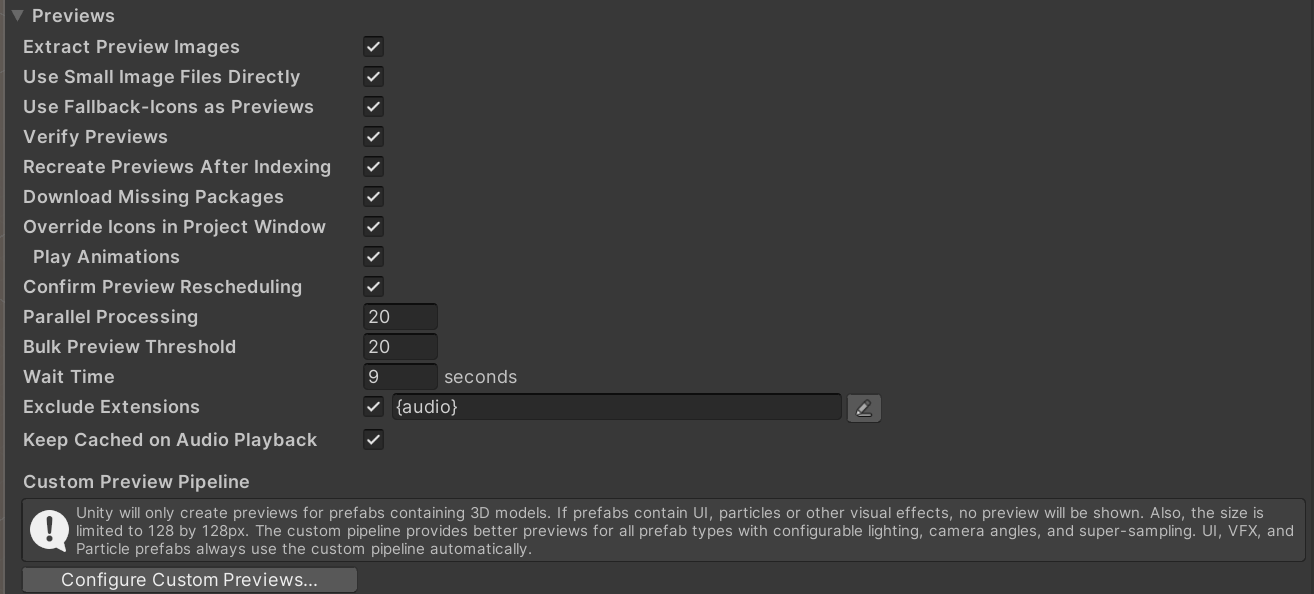
The tool will by default not recreate previews for audio files. These usually take a very long time with rather limited benefit. This can be changed with the Exclude Extensions setting. The field allows to enter any arbitrary file extension like wav but also accepts tool-internal type groups which bundle multiple extensions at once. Available type groups are:
- Audio, Images, Videos, Prefabs, Materials, Shaders, Models, Effects, Animations, Fonts, Scripts, Libraries, Documents, Scenes
Unity’s own previews are limited in multiple ways:
- Limited to 128x128 pixels, with often bad lighting, especially in SRPs
- No support for UI, fonts, videos, particle and VFX systems
- No animation preview
The tool includes a custom infrastructure to create better previews which solve all of the above. All settings for it can be found under Settings/Preview Images/Configure Custom previews.
The window will show a preview of all supported custom preview types. This also includes Unity-supported types like 3d prefabs, fbx and materials as it significantly enhances their representation. There are many parameters to tweak the previews the way you want.
For particle systems and VFX previews you can set a minimum visible playback duration in the custom preview settings. This helps capture effects that need a short warm-up time before their visually important frame appears.
The preview pipeline includes dedicated handling for Shader Graph, particle shaders and render-pipeline conversion so recreated previews are less likely to show incorrect pink or empty results.
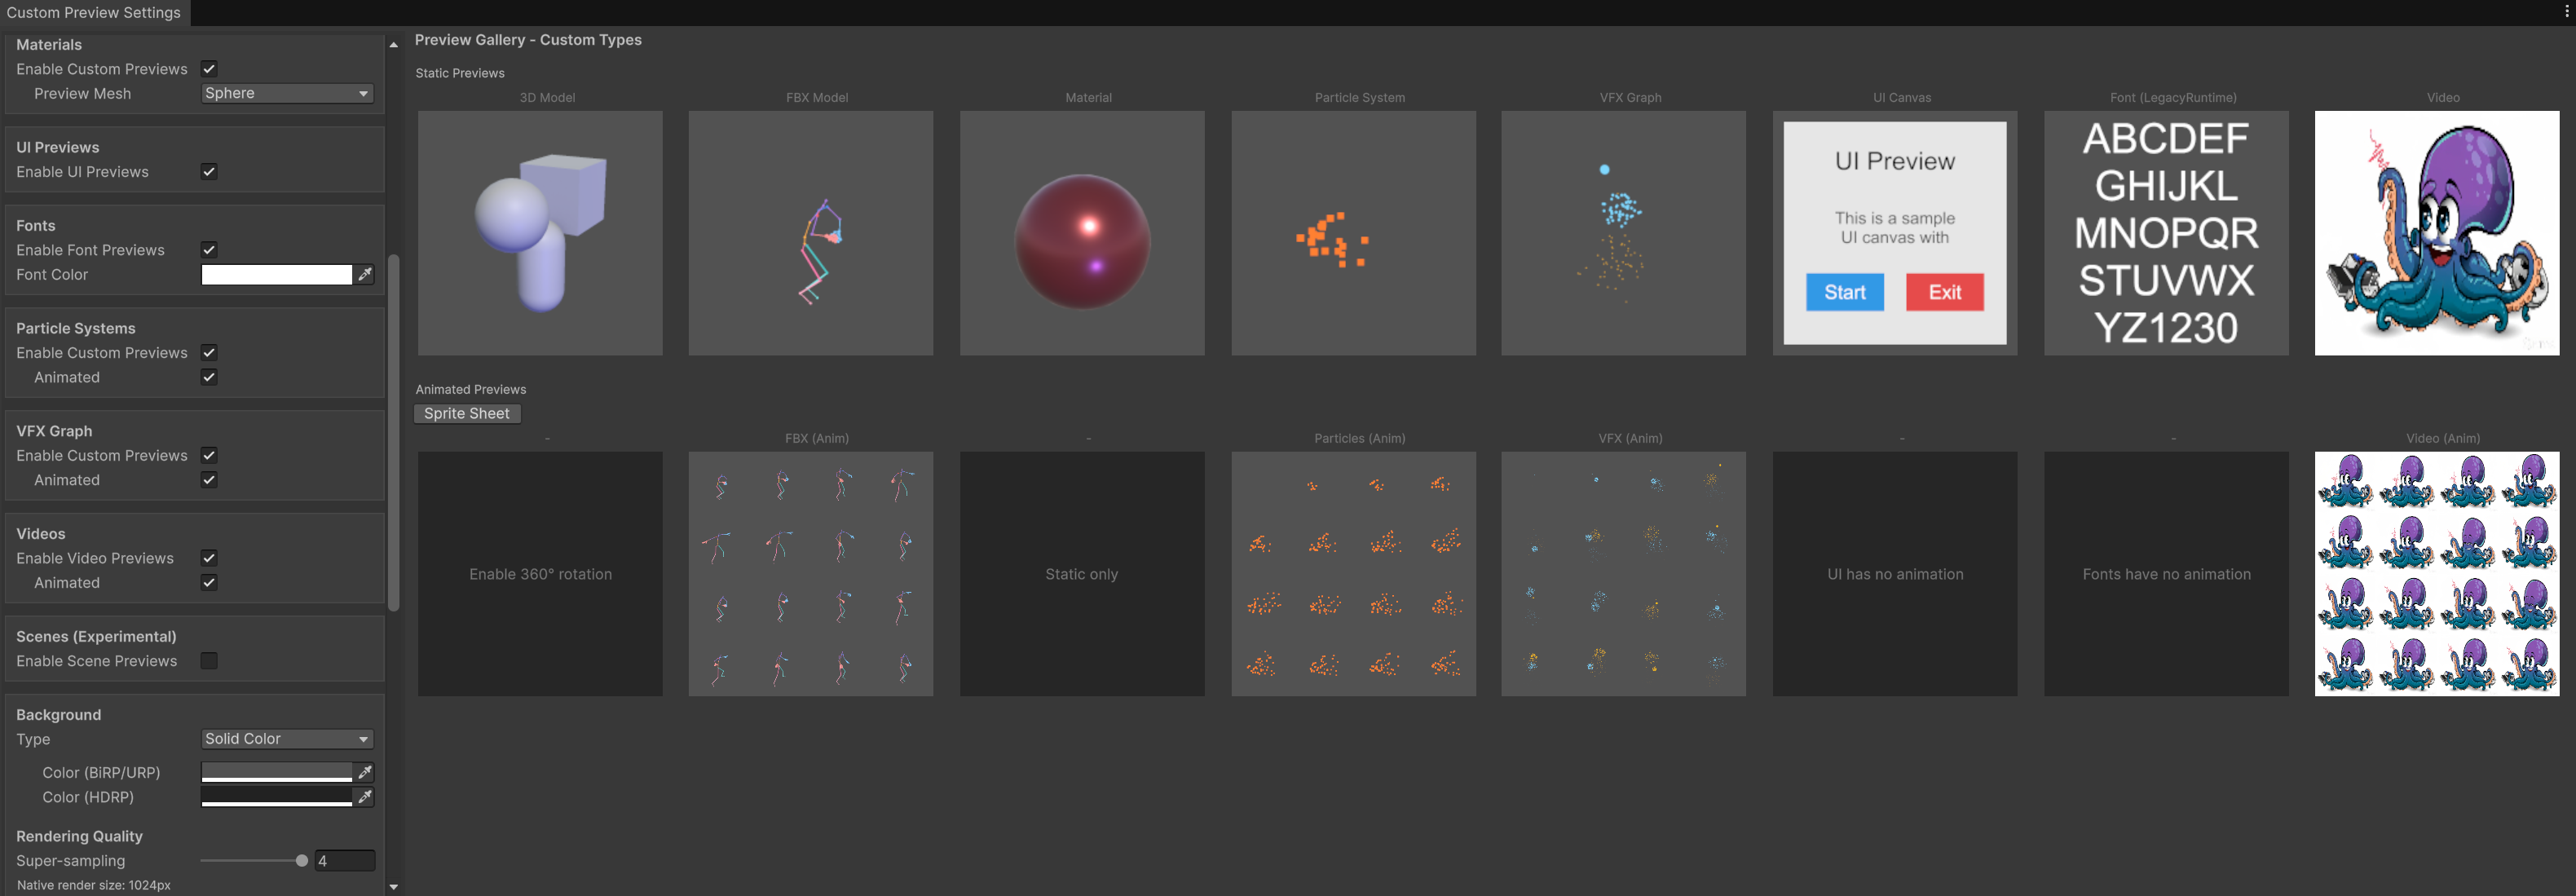
Animated previews will play directly in the search results when an item is selected. FBX animations will show the first non T-Pose animation as a preview.
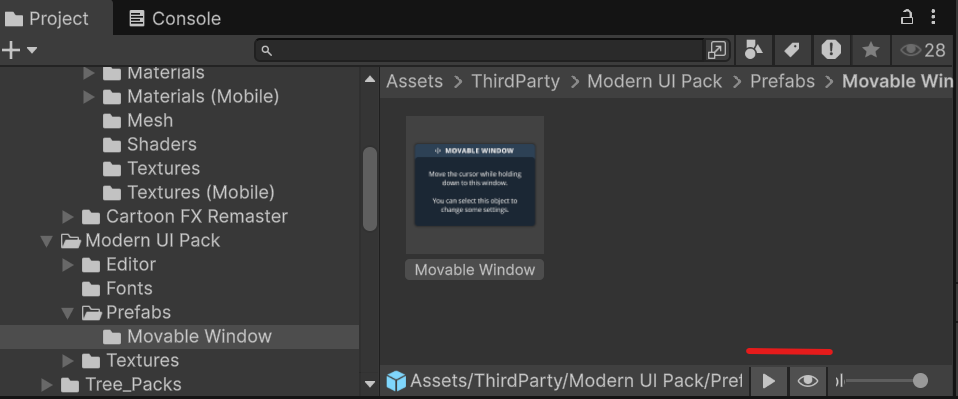
Once an item is imported, the tool will also automatically replace the preview that Unity shows in the Project window, including animated previews. You can toggle this behavior using the two additional buttons at the lower right of the Project window.
Backup
The tool supports two backup mechanisms, one for packages from the Asset Store and one for the database of the tool itself.
This will copy packages to a dedicated place for a permanent backup. This way you are not affected by package deprecation by Unity where it might be impossible to download older (but for you working or compatible) versions of assets anymore.
The backup tool can keep multiple versions of packages and will automatically handle the life cycle, version comparison and more.
Per default, all files are stored flat in a single folder. If you need some sort of structuring inside the folder to better support replication scenarios, you can move arbitrary files into sub-folders. The tool will honor this dynamically and put new backup revisions into the respective folders then.

Once backup is configured and the corresponding action activated, it can be set individually per package in the package details (also in bulk).
The tool will store all data, index information, AI captions and more in a central database. It is prudent to regularly do a backup in case of accidental deletion of packages or running destructive operations. This way you can go back to a working state and only need to redo the delta since then and not potentially the whole database.
This type of backup is active by default and will also be stored in the central backup folder. There you find the .db files with their timestamp. Right now this is only available when using SQLite as the database backend. A backup of the current configuration will also be made.

Artificial Intelligence
Using AI it is possible to automatically create captions or remote control Unity and the tool using the Unity MCP server. Both of these capabilities are extremely powerful and even more so when used in combination.
Captions are short texts that describe individual asset files. This way you are also able to find files which are labeled inappropriate or insufficient. See the example below:
Ollama, which is a modern and sophisticated solution to run many different models locally. It is much easier to set up, supports a continuously updated list of new models, runs very efficient and also very fast. This is the recommended way.
Ollama Setup
Follow the installation instructions on https://ollama.com/. Once installed, the tool will detect the installed service automatically.
LM Studio Setup
Follow the installation instructions on https://lmstudio.ai/. Once installed, start the local server.
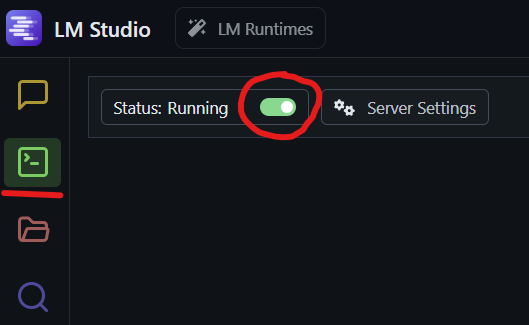
The tool will detect the installed service and list the available models afterwards automatically.
Blip Setup
To use it locally, Python 3, pipx and the blip-caption tool are required to be installed. These are the basic steps assuming basic familiarity with the computer system:
- Install PipX
- Windows
- Install Scoop
- Open a new PowerShell window (no admin required)
- Run: Set-ExecutionPolicy -ExecutionPolicy RemoteSigned -Scope CurrentUser
- Run: Invoke-RestMethod -Uri https://get.scoop.sh | Invoke-Expression
- Switch to a normal Command line window
- Run: scoop install pipx
- Run: pipx ensurepath
- Install Scoop
- MacOS
- Run: brew install pipx
- Run: pipx ensurepath
- Windows
- Install tooling
- Run: pipx install blip-caption
- In case of errors on MacOS, most likely need torch in an older Python version (use an environment therefore and adapt global path)
- Run: /usr/bin/python3 -m venv .venv
- Run: . .venv/bin/activate
- Run: pip install blip-caption
- Edit ~/.zshrc and add: export PATH=”$PATH:/Users/NAME/.venv/bin”
- Run: source ~/.zshrc
- In case of errors on MacOS, most likely need torch in an older Python version (use an environment therefore and adapt global path)
- Run: pipx ensurepath
- Run: pipx install blip-caption
- Restart the system
- Click “Create Caption” in the Settings/AI section to test if all if working as expected. The first time the tool starts will take a significant amount of time since it will download the model file once.
custom patch of the blip tool to be installed. You can install this custom version via:
pipx install git+https://github.com/mutherr/blip-caption-gpu/ --force
You also need to make sure to have PyTorch with GPU support as well as a CUDA runtime installed. Instructions can be found on the official website.
Once that is done you can activate GPU (advanced option, hold CTRL), which dramatically speeds up the generation of AI captions (especially with larger bulk sizes).
Good bulk sizes are 50 to 100. Higher is more efficient, but will produce less progress information.
Usage
On the Settings tab the successful installation can be tested.
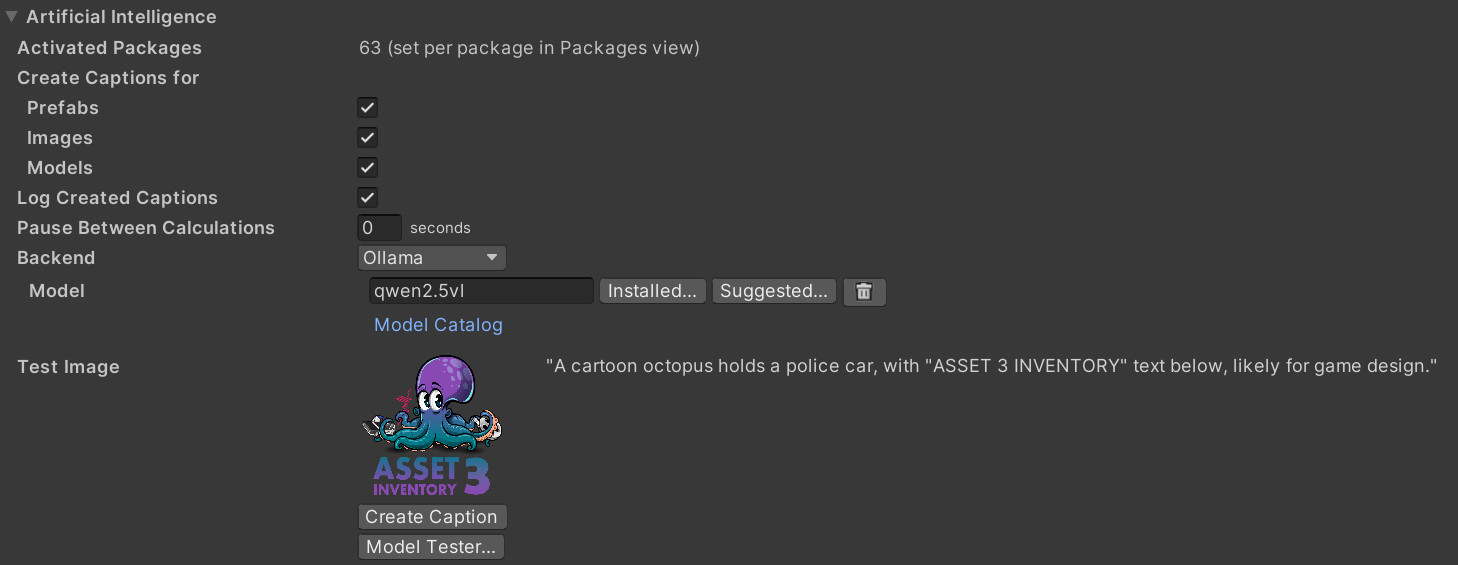
Once activated, the tool will create AI captions during the next Update cycle for packages where AI Caption was turned on in the Package view.
There is also an option to search in the AI captions in the search settings and the AI caption can also be shown as the tile text if wanted.
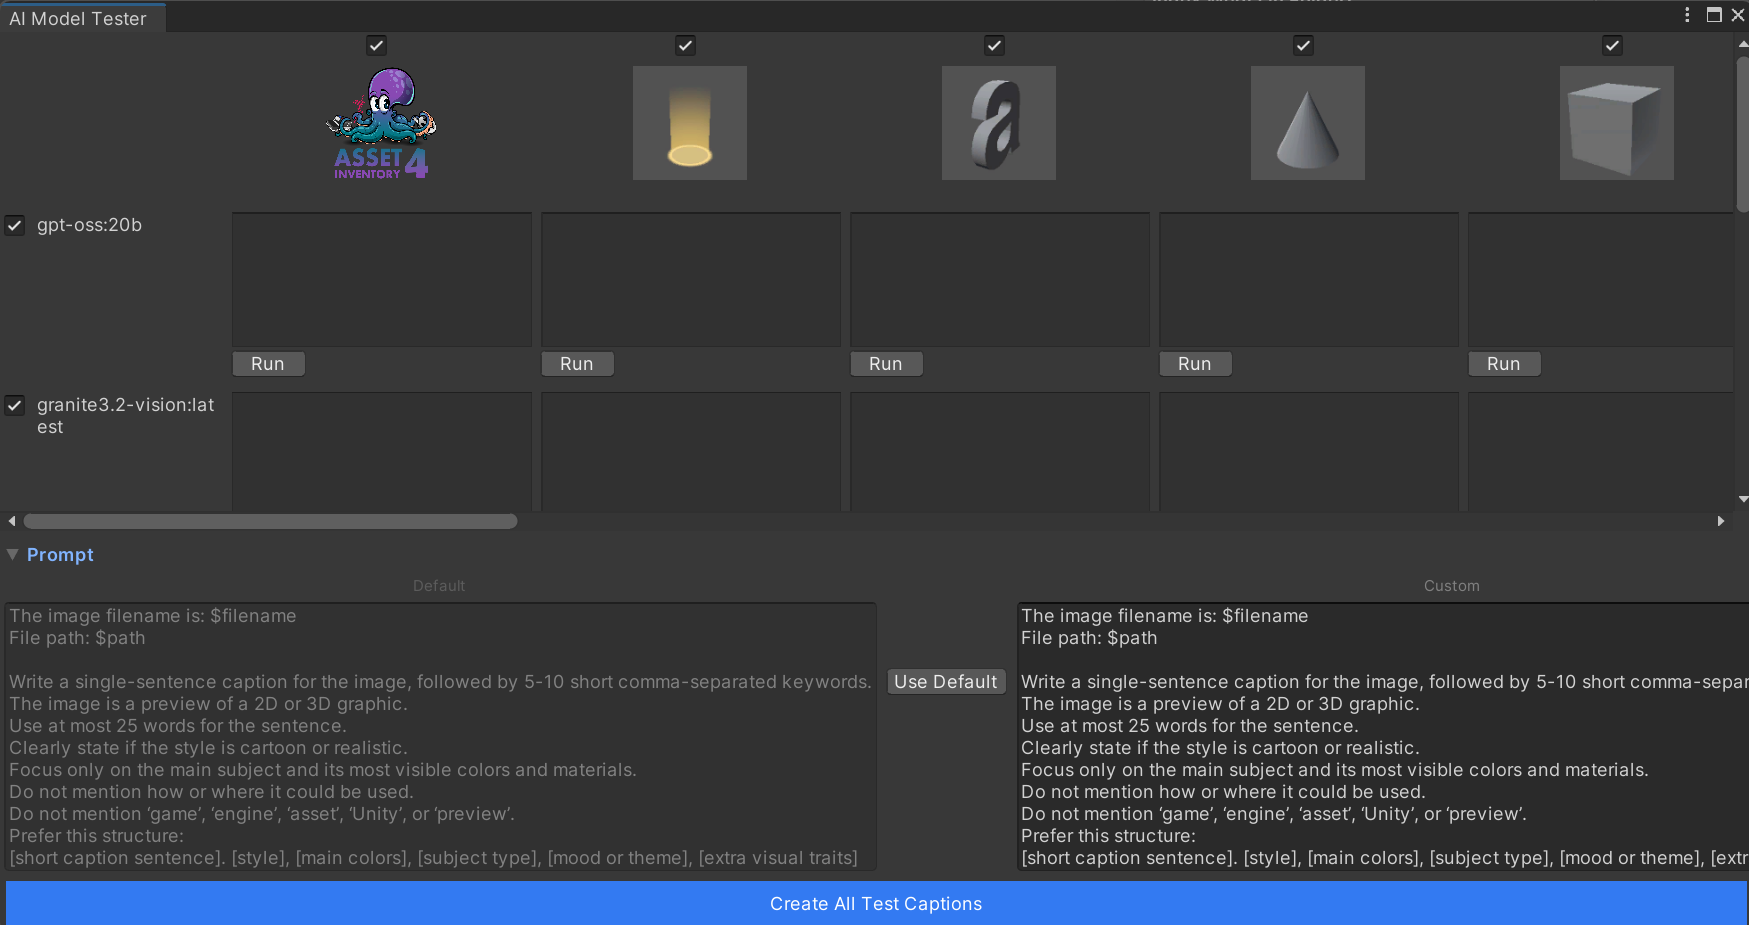
Adjusting the Prompt
The default prompt for captioning can be overridden using the Customize button in the Prompt section in the bottom of the Model Tester. You can instantly see the changes by recreating the test captions.
For additional context, the captions support variables which come from the currently processed file:
- filename, path, sourcepath, type, size, width, height, length, assetid, guid
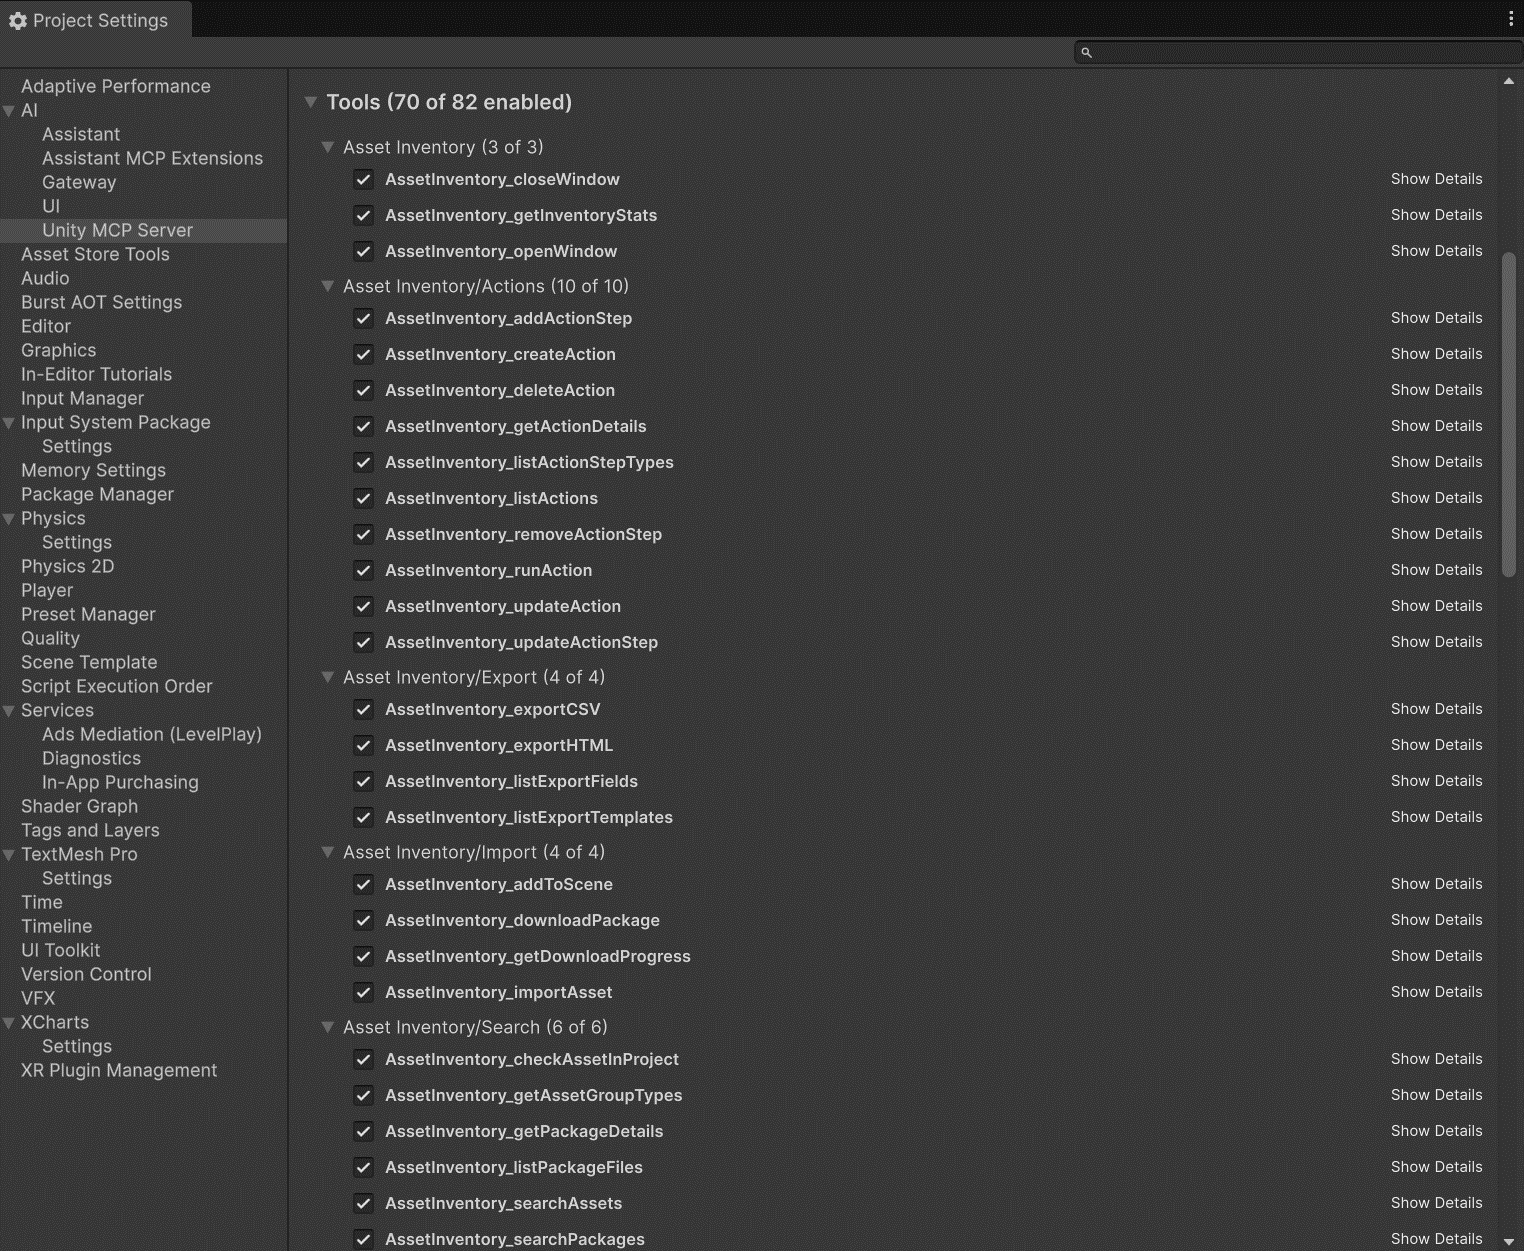
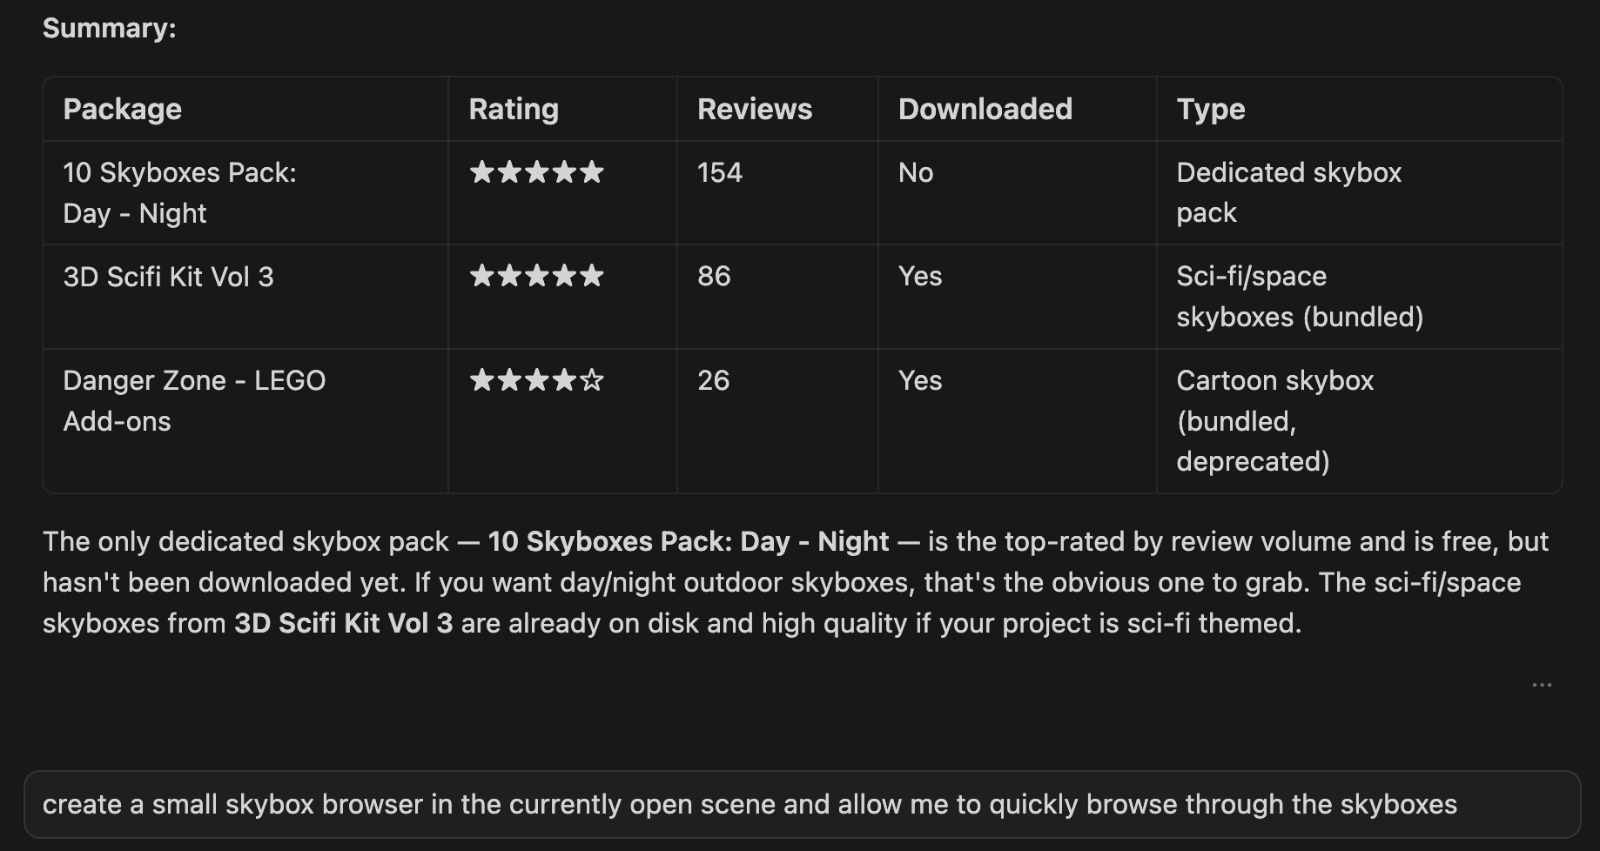
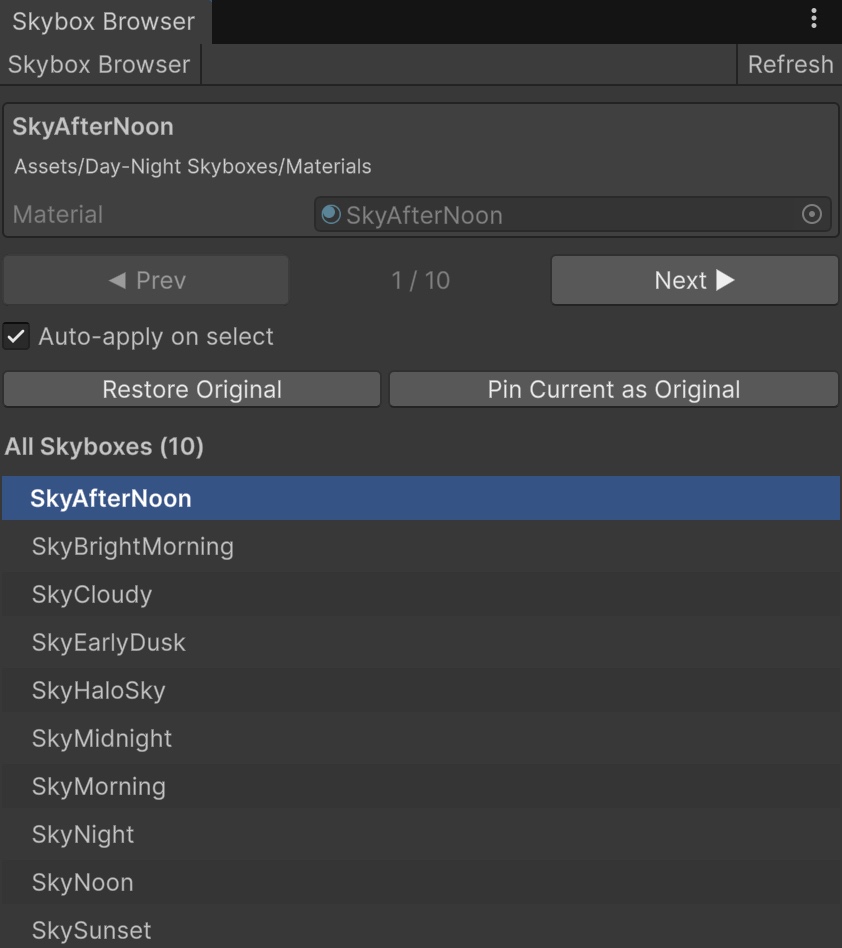
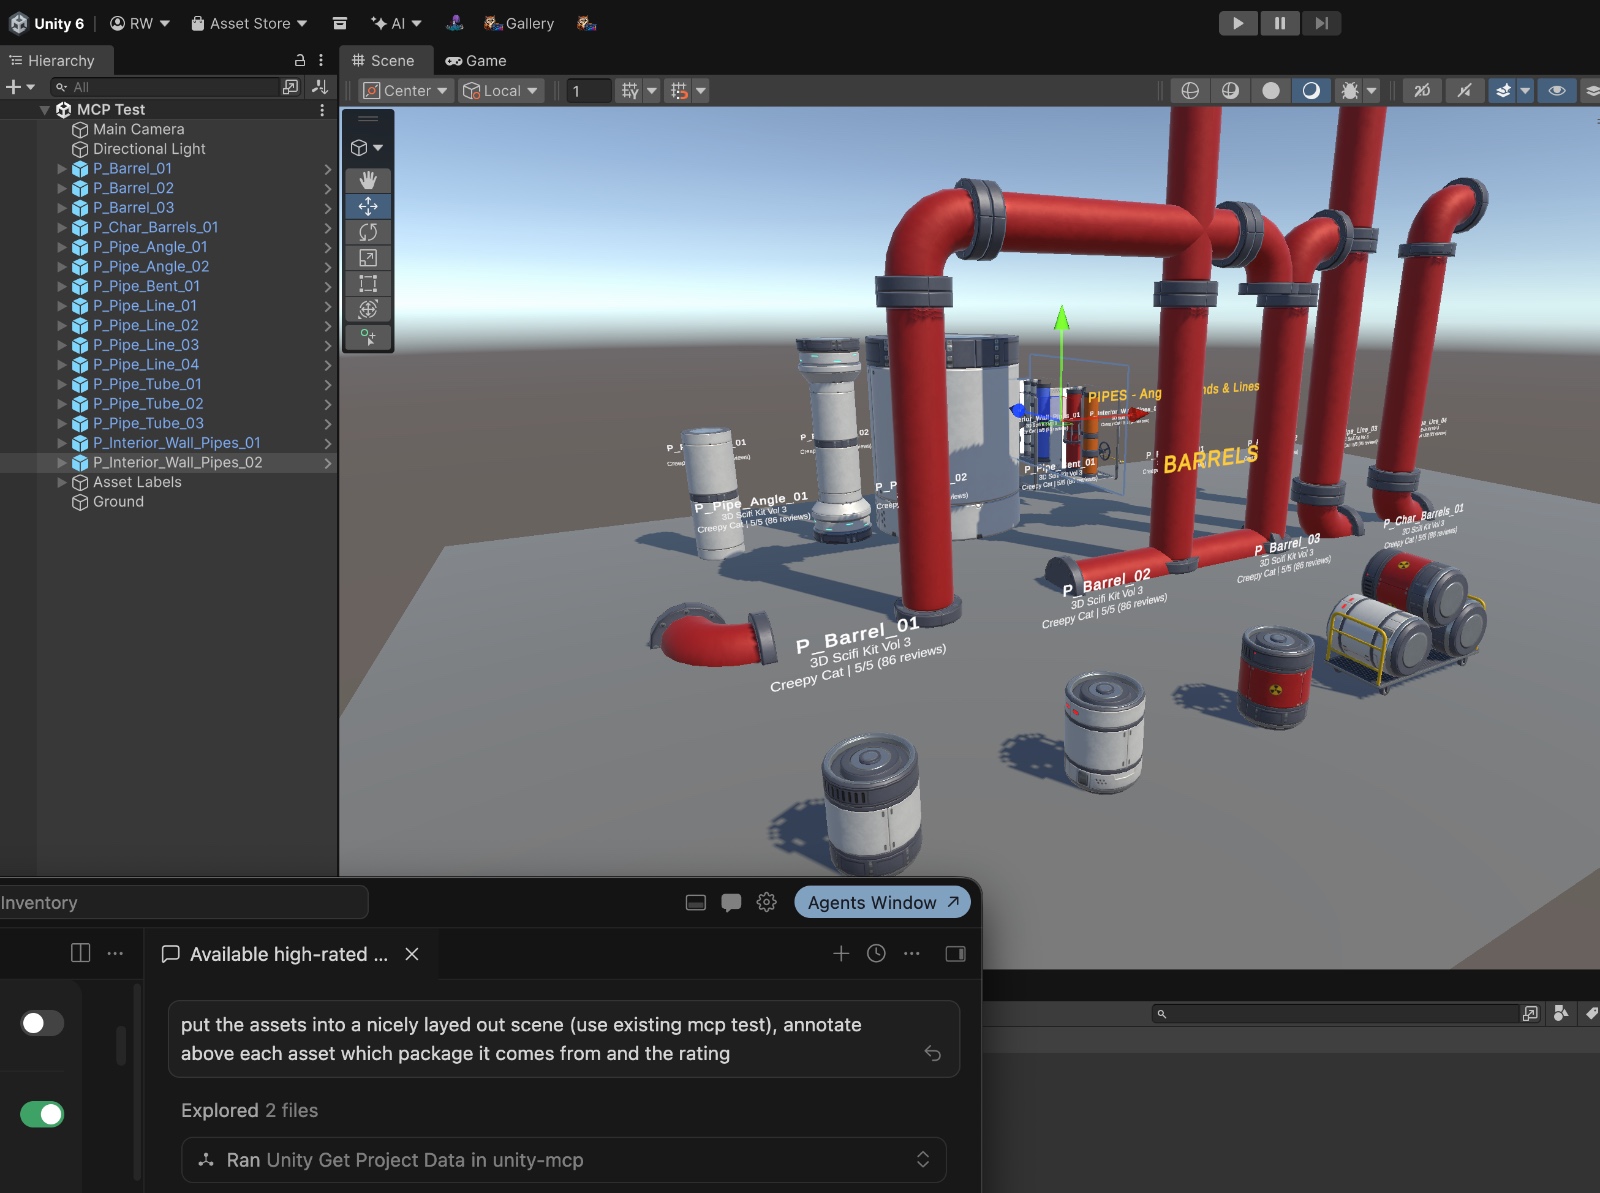
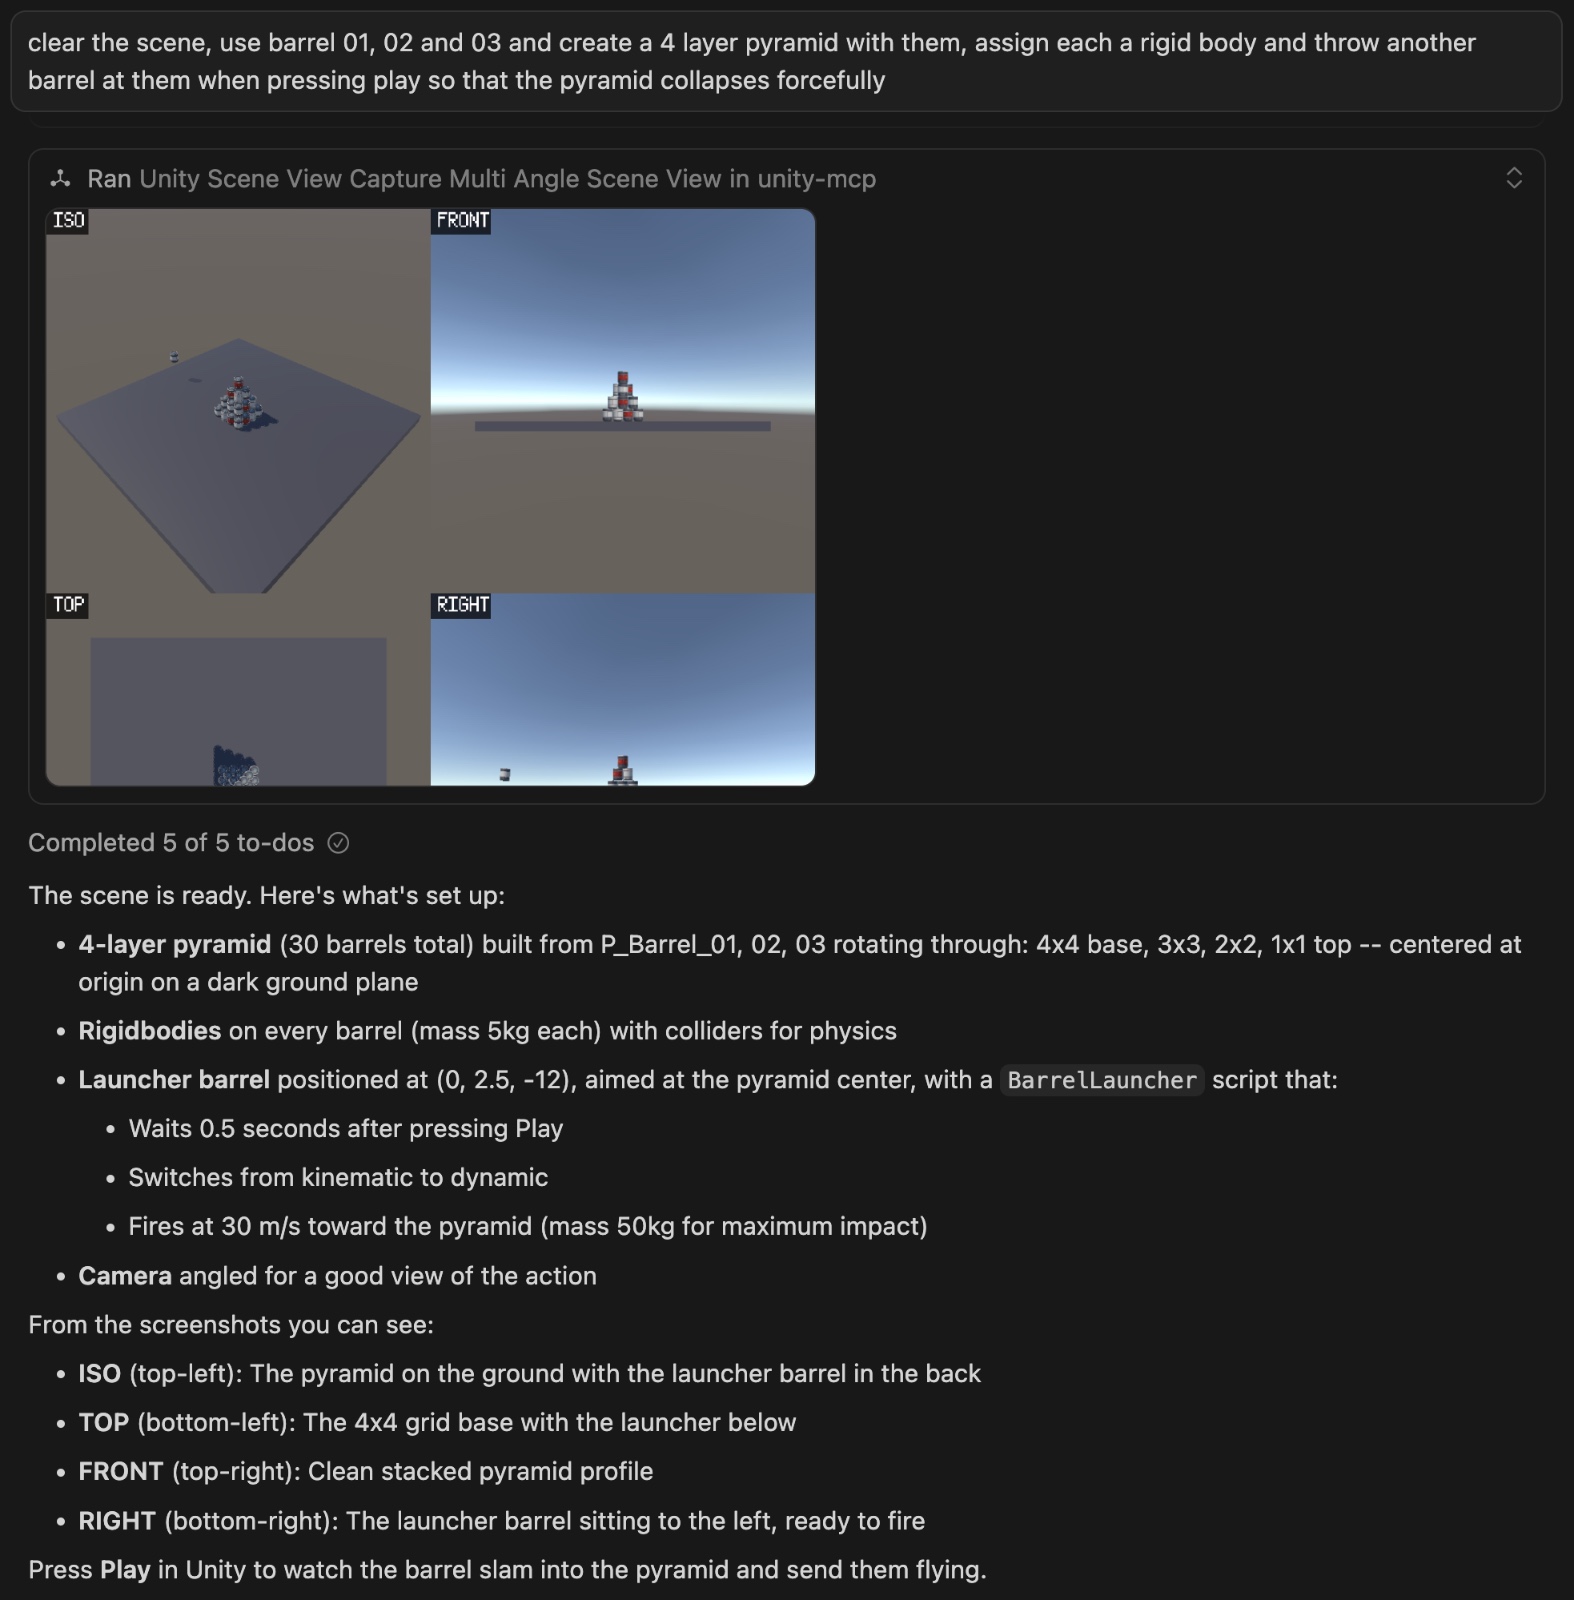
The Unity MCP Server is a new package which allows AI tools like Cursor or Claude to remote-control Unity by utilizing the provided tools. Asset Inventory adds 30+ custom tools which can be activated. They span from package and file search to info, tags and download operations but also extend to creating custom actions, exporting data and more. Activate the actions you want in the Project Settings.
MCP tools also expose project search, package search, file import, package download, tagging, custom actions and export operations so AI assistants can work with the same asset library visible in the editor UI.
Once activated, the AI can browse your asset library, download packages if they are not cached yet and import individual files, fully automatic. This allows you to assemble scenes with any item you own, create prototypes in minutes and experiment with totally new ideas freely while having access to your full asset library.
Examples


Database Configuration
The tool supports two distinct database types which you can select from:
- SQLite: the recommended default, fast & reliable, no setup required, works out of the box, highly portable, can handle millions of records, limited network capabilities
- MySQL/MariaDB: for professional setups with multiple people accessing the database concurrently, highly scalable, good concurrent access support, network accessible
You can switch between these under Settings/Locations/Database/Configure. Existing data will not be copied to the new database.
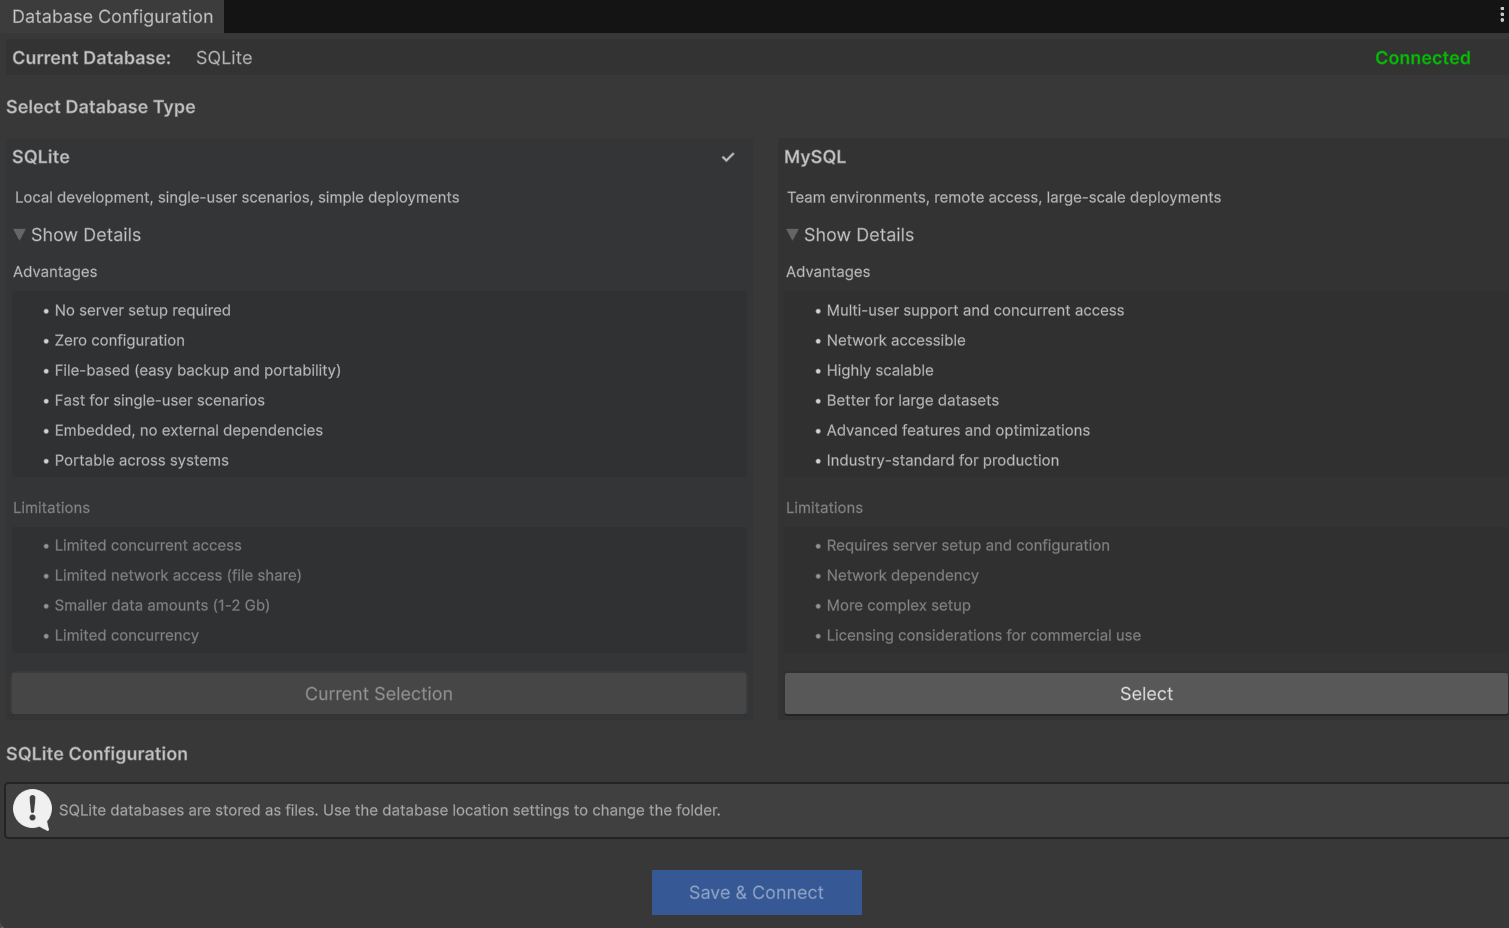
In case of SQLite the database will automatically be created upon first usage. The default location is in the Documents/AssetInventory directory. The size should be rather small but increases with the number of indexed assets. As a rule of thumb assume 20Mb database + 200Mb preview images per 30k files (if not upscaled). With 2 million files indexed it will be around 1.2Gb in size.
Database Access
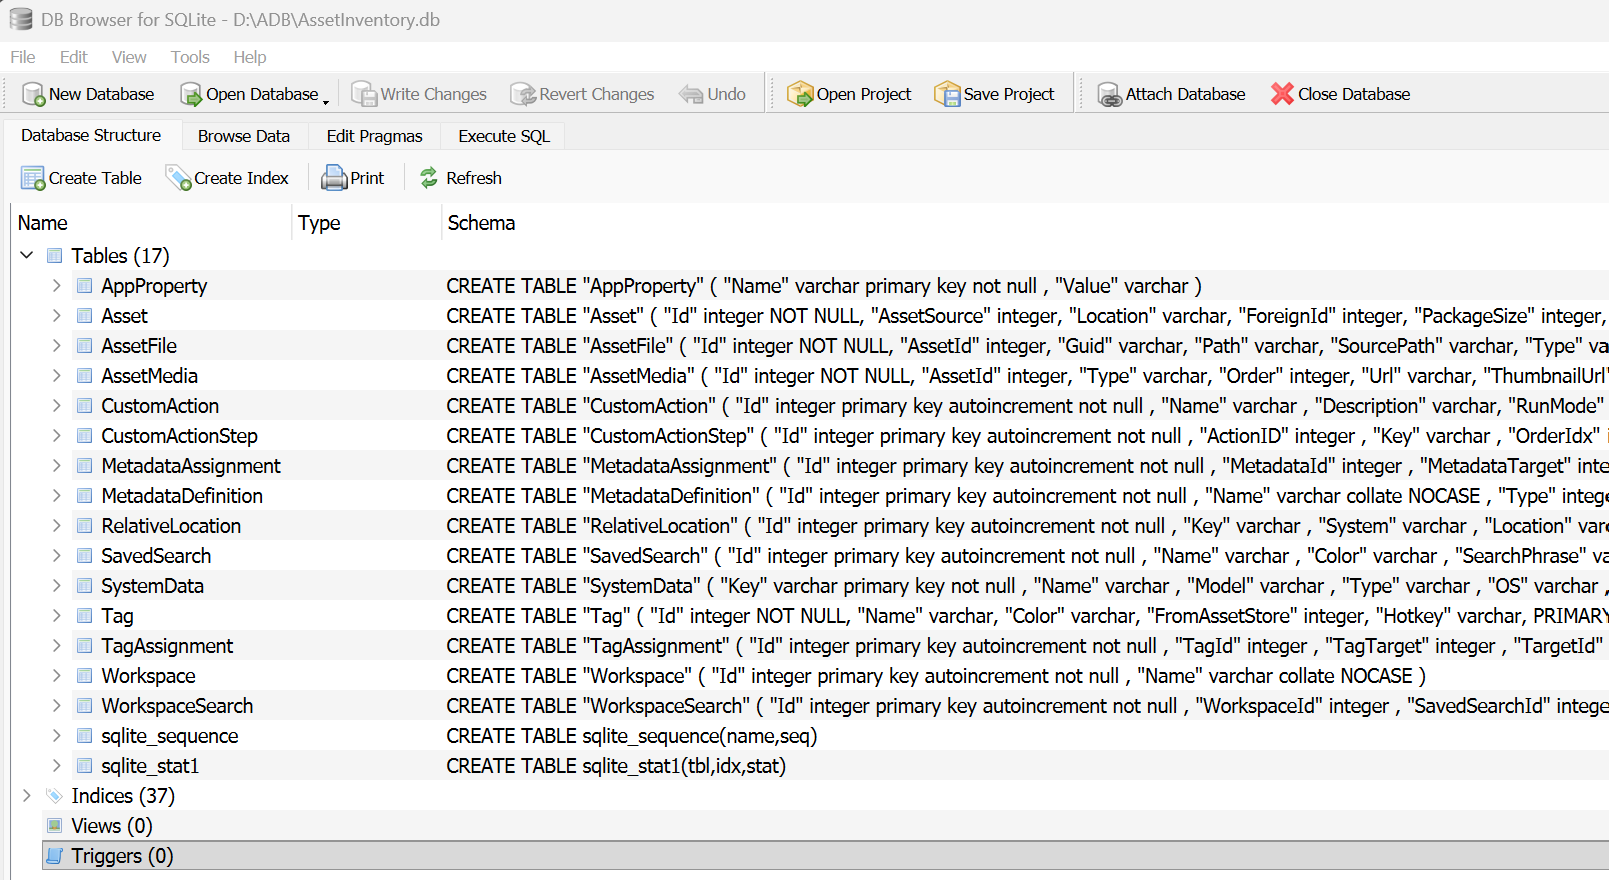
It is possible to connect to the database directly and perform your own analysis and queries with the collected data.
- For SQLite format, a good viewer is DB Browser for SQLite.
- For MySQL/MariaDB HeidiSQL does a great job.
FTP Configuration
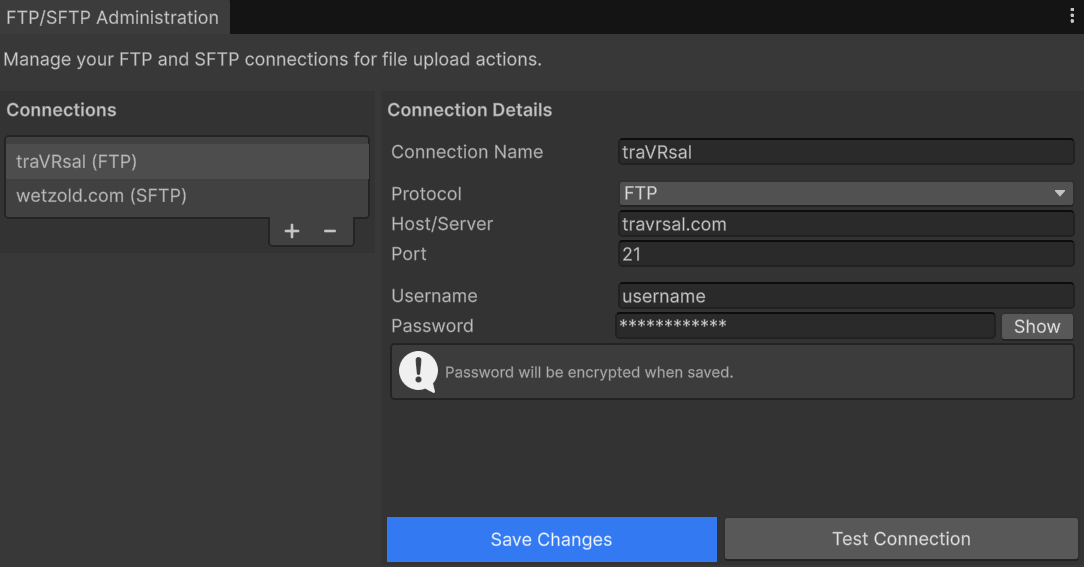
There are custom action steps that support connecting to an FTP server. You can configure these under Settings/Locations. The dedicated FTP UI allows to manage multiple connections. For protocols, FTP, FTPS and SFTP are supported. Your passwords will be encrypted in the configuration file and are only readable on your machine.
Cross-Device Usage
It is possible to use the same database from multiple devices. This way the indexed assets can be browsed and seen from every device. The easiest way to achieve this is to make the database and all asset folders available through a mounted network drive. If the drives and folders are identical from each device, it will instantly work this way. Also if Asset and Package cache folders differ the database will be compatible since these paths will be stored with [ac] and [pc] keys (see below). Furthermore, all paths are stored with forward slashes, making the database compatible between different operating systems.
Sometimes drives or folder mappings cannot be kept identical for various reasons. The tool supports this scenario through a mechanism called Relative Persistence. Each additional folder entry is replaced with a key and all occurrences in the database to this folder are also replaced with this key. On each device the key can then be mapped to the required drive and folder. This is a one-time action and once done the tool can be used as always.
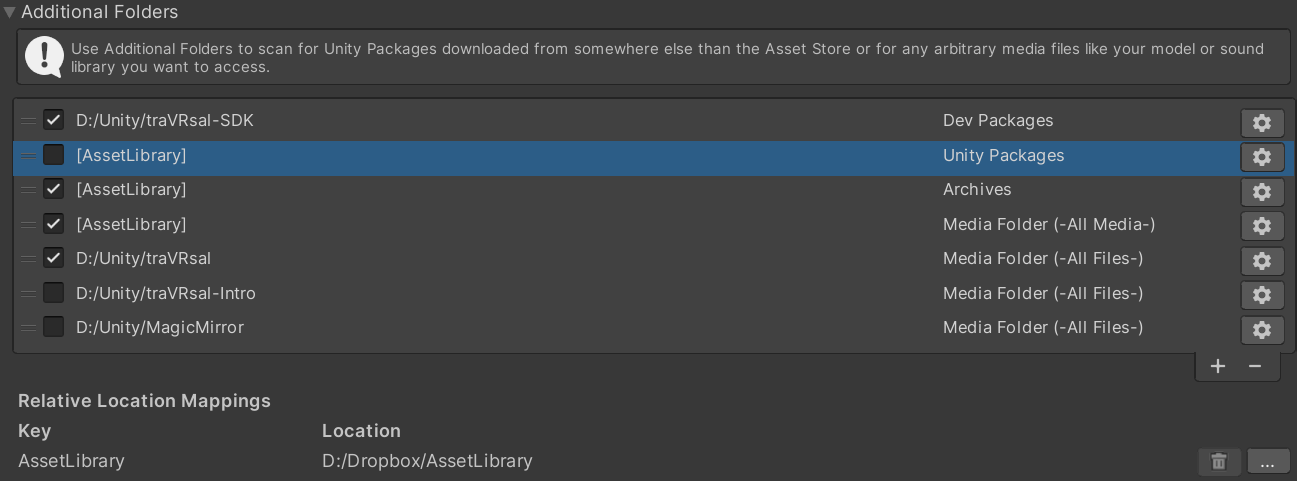
In order to convert a folder to relative format, open the folder settings, hold down CTRL and select Enable…
Automatisch generierte Beschreibung“ src=“/tools/assetinventory/docs/media/3d107acb46208764.png” loading=“lazy” decoding=“async”> <img alt=“Ein Bild, das Text, Screenshot, Software, Display enthält.
Automatisch generierte Beschreibung“ src=“/tools/assetinventory/docs/media/d0436604ae0de454.png” loading=“lazy” decoding=“async”>
Maintenance
Maintenance functions are located on the Settings tab:
Harmless & recommended to run regularly
- Maintenance Wizard: will scan for common database and file system inconsistencies and offer automatic solutions
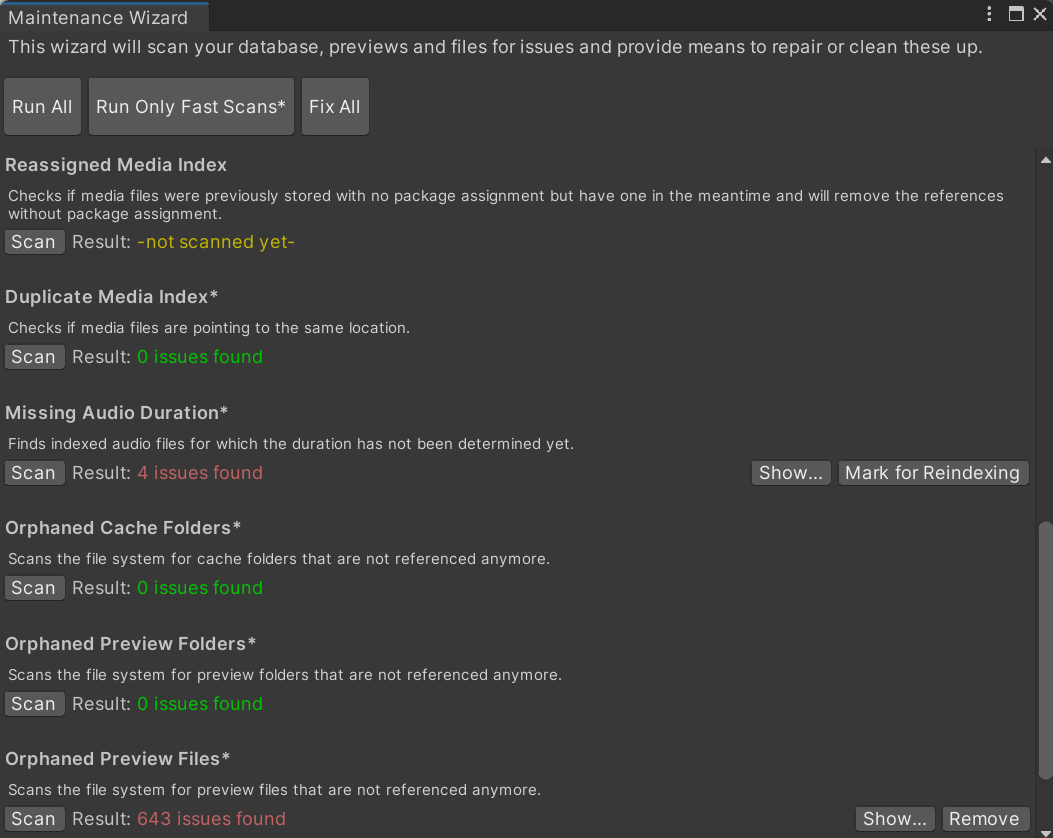
- The Maintenance Wizard list can be searched, which is helpful when many validators are available or a scan returns many issue rows.
- Unneeded previews for hidden files can be detected and cleaned up to reclaim preview storage without deleting source assets.
- Previews Wizard: will try to create preview images for asset files which do not have ones so far or were flagged to be recreated. This can take quite some time especially for complex prefabs.
- Optimize Database: compacts and reorganizes the database for more performance and less required space, should be done after bigger indexing activities
Harmless
- Close Database: allow backing up or copying the file
- Clear Cache: deletes the temporary files to save space, can be done without any side-effects
In order not to clutter the UI, some seldom used settings are to be set directly in the configuration file. It is in formatted JSON format and can be opened in any text editor when Unity is closed. The following properties do only appear there:
- centerTiles (bool): will center grid views instead of left-aligning within window
- dbJournalMode (string): defines the journal mode to be used with the SQLite database. Default is “WAL”. Use “DELETE” for a more conservative method in case of database issues. Other options see link.
- hueRange (float): degrees to widen color search
- inMemorySearchDelay (float): seconds after typing a character to wait until triggering in-memory search
- maxResultsLimit (int): hard limit of maximum results to be shown even if -all- is selected
- mediaHeight (int): size in pixels for big media image
- mediaThumbnailWidth (int): size in pixels for width of media thumbnails
- mediaThumbnailHeight (int): size in pixels for height of media thumbnails
- rowHeightMultiplier (float): adjustment factor to the height of table rows
- searchDelay (float): seconds after typing a character to wait until triggering search
- showExtensionList (bool): flag if to list all indexed extensions in the Types dropdown on the search. Can result in significant lag while typing if the database is large.
- showHints (bool): flag if to show additional usability hints in the UI