Create Your First 3D Title
Prerequisites and installation order
Text Studio 3D requires Unity 2023.2 or newer, Text Studio 1.0.1 or newer, Unity UI 2.0.0 or newer, which includes TextMeshPro, and Mathematics 1.3.2 or newer. Install Text Studio first, verify a normal animated text object, then install Text Studio 3D and allow Unity to compile before importing optional integrations.
- Confirm Tools > Text Studio contains 3D Gallery, and Tools > Text Studio > 3D contains Build Preparation, the browsers, Live Preview, diagnostics, and setup commands.
- Create one default Text Studio 3D object and confirm that readable geometry appears without assigning a custom style or technical Font3D asset.
- Keep Font Source set to Text Object unless the object should explicitly inherit typography from a 3D Theme.
- Check the active render pipeline material family before changing geometry settings, then open Build Readiness before choosing a runtime font policy.
Add 3D to an existing Text Studio object
Select a compatible world-space text object and use its setup card to add Text Studio 3D. The component follows Text Studio content, typography, reveal, effects, and placement, then generates dimensional geometry. When the optional UniText integration is active, shaped world-space text can use the same path without requiring a TextMeshPro component.
Step 1: Open the 3D Gallery
Choose Tools > Text Studio > 3D Gallery. Select a real rendered style preview, inspect its layers and requirements, then create a new title or apply the style to the selected Text Studio object. Use Style Compare when two candidates need a fair side-by-side judgment.
Step 2: Enter the text in Text Studio
The base Text Studio component remains the source of truth for content, typewriter timing, placement, and effects. The 3D inspector controls only geometry, materials, output, and 3D-specific behavior. A world-space TextMeshPro setup card can add Text Studio and Text Studio 3D in one step while preserving existing text. When UniText World and the optional integration are installed, Text Studio selects that backend automatically and drives the same extruded workflow without requiring a TextMeshPro component.
Step 3: Follow the persistent workflow
The inspector keeps Setup Status, 3D Style, Mesh Detail, Live 3D Preview, Depth Extrusion Sweep, Mesh Output, Performance, Physical Letters, Glyph Sockets, 3D Modules, Runtime Statistics, Build Readiness, and Static Output in persistent foldouts. Open only the section needed for the current decision; every setting remains reachable without switching inspector modes.
Build Readiness explains whether the current font, output, style, and module stack can satisfy Generate if missing or Prepared only. Read it before treating a successful Edit Mode preview as proof that the same glyphs can be generated in a player.
Step 4: Preview before entering Play Mode
Open Live 3D Preview. Use front, perspective, side, and back views, orbit and pan, studio lighting, wireframe, material regions, normals, sockets, contour direction, and bounds to understand the result. Then use the base Text Studio preview to judge reveal, Active motion, Hide, spatial fields, and reduced-motion behavior on the same geometry.
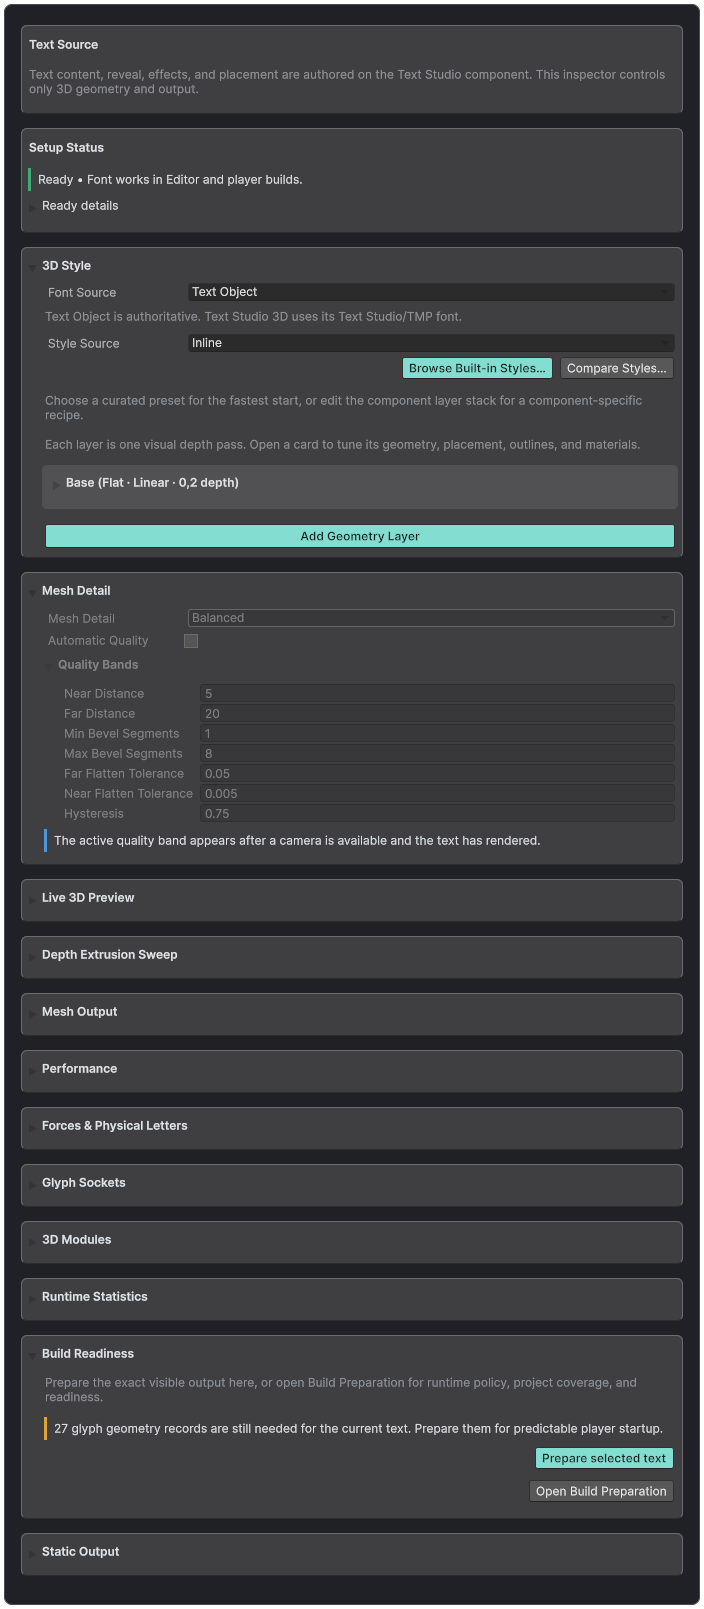
The current inspector keeps geometry, output, modules, runtime statistics, build preparation, and static output in one persistent workflow.