Create Composed Effects
A Composed Effect is Text Studio's only reusable no-code Effect asset. Use one when a treatment needs coordinated layers, reusable timing, spatial influence, or designer-friendly authoring. Built-in and custom Code Effects remain programmable leaf primitives and enter a composition as Existing Effect layers. Choose a 2D or 3D authoring space first. Text Studio hides unavailable choices but preserves existing 3D data if an add-on is temporarily absent.
A small, successful recipe
- Add Elastic for the reveal.
- Add Color Pulse for the readable active state.
- Add Corner Deformation only if the silhouette benefits from it.
- Choose phases, sequence, area, curve, and influence for each layer.
- Solo a layer while tuning it, then compare the complete result.
- Use Extract when one useful layer should become a reusable asset.
Visual layers and nested effects
Visual layers cover position, rotation, scale, alpha, color, skew, UV movement, pivot, corner deformation, and extension channels. Each layer can also select original text colors by hue, saturation, perceptual luminance, or alpha, with smooth tolerance and inversion controls. Existing Effect layers reuse any registered built-in, Code Effect, runtime factory, or Composed Effect with typed controls, area, phase, timing, scope, and staggering. Every published parameter appears immediately without an override checkbox and is snapshotted when the layer is authored, so later source-default changes do not alter the composition. Reset one field or Reset All to adopt current source defaults explicitly.
Preview and share
The Composer previews the real authored stack, including layer order, phases, timing, grouping, blends, spatial fields, surface masks, and renderer capability warnings. Use the same Reveal, Active, and Hide reasoning as the main inspector, then scrub exact states before judging the motion at normal speed.
Save the result as a Composed Effect when several objects should reference one treatment. Use Effect Code when the treatment needs to move between projects or people: the payload includes readable metadata and dependencies, while import uses stable identities and reports conflicts before replacing anything.
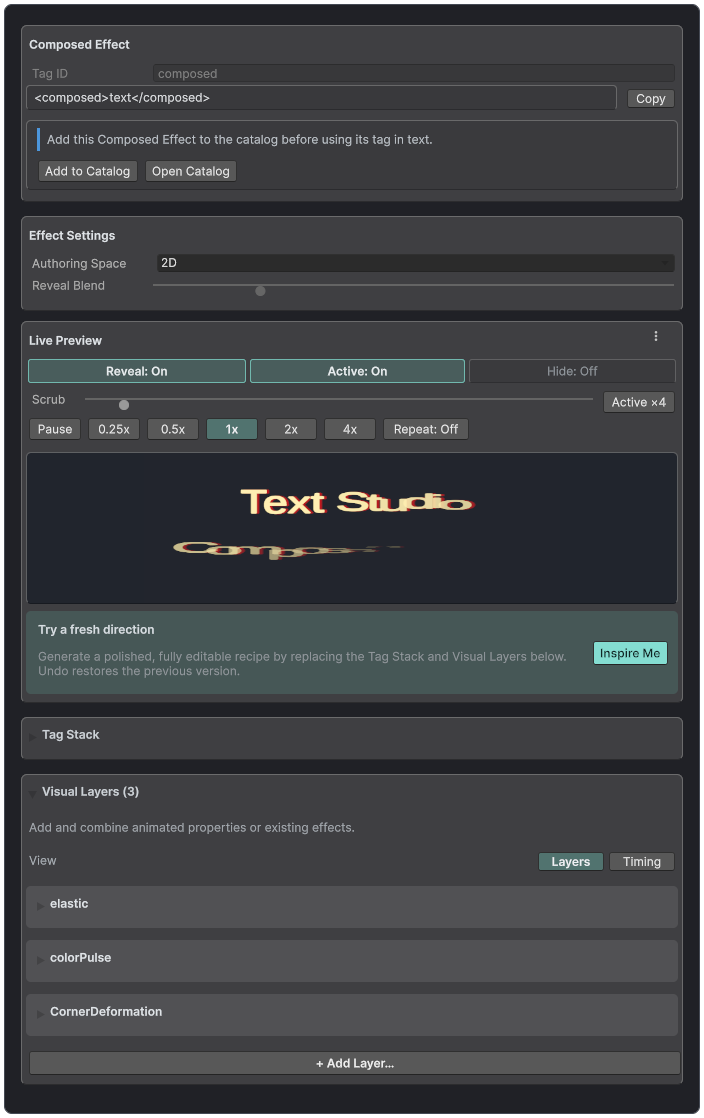
A Composed Effect keeps visual layers, timing, spatial influence, and sharing in one reusable asset.
The composer workspace
Identity defines the asset name, catalog information, and optional Tag ID. Authoring Space declares whether the asset is planar or can use installed 3D channels. The usage snippet shows the exact opening and closing markup. Effect Settings control the global reveal-to-active handoff. Live Preview owns view, phase, quality, playback, scrubbing, comparison, and export.
- Layer Stack is the ordered evaluation list.
- Add Layer opens built-in effects, custom effects, composed effects, and typed visual channels.
- Inspire Me creates a reviewable starting stack, not hidden runtime behavior.
- Effect Code copies the treatment and its required dependencies with conflict-safe identities.
- Draft preview prioritizes iteration speed. Full preview is the final visual check.
Layer operations and evaluation order
Enabled controls whether a layer participates in the result. Solo is preview-only and isolates one layer without changing the serialized stack. Rename layers by intent, such as Reveal Lift or Active Highlight. Reorder by dragging. Duplicate before experimenting. Delete only after checking nested dependencies. Extract creates a reusable nested Composed Effect when a useful sub-stack should be shared.
Layers evaluate from top to bottom in the displayed order, and each layer sees the state produced by earlier layers. This matters for Override and Lerp behavior, source versus accumulated color, and two layers writing the same transform channel. Keep independent channels separate and place deliberate overrides after the contribution they replace.
Visual channels
- Position adds or blends a local glyph offset.
- Rotation composes a per-glyph quaternion around the current pivot.
- Scale multiplies or blends the current glyph scale.
- Alpha multiplies or interpolates visibility without changing source text.
- Color can set, multiply, or interpolate the current glyph color.
- Skew changes the glyph quad without changing text layout.
- UV Offset moves material sampling where the active renderer supports it.
- Pivot changes the origin used by rotation and scale.
- Corner Deformation offsets individual glyph corners for flags, ripples, squeezes, and custom silhouettes.
- Registered extension channels retain stable namespaced IDs so optional renderers and add-ons can add capabilities without changing the base asset format.
A layer should change only the channels it intends to own. Position must not silently reset color, and a color layer must not replace reveal or placement. Unsupported channels are preserved in the asset and reported by diagnostics instead of being silently discarded.
Phases, curves, playback, and phase shift
Assign Reveal, Active, and Hide independently on every layer. The Curve shapes normalized progress. Playback decides how that curve is repeated or externally driven. Duration and speed set the layer clock. Phase Shift offsets the layer relative to the resolved unit index, and timing stagger offsets units without changing their area.
Once runs a finite treatment. Loop repeats. Ping-Pong alternates forward and return. Weighted follows an input curve. External follows supplied progress. Start delay, forward time, peak hold, return time, cycle count, cycle gap, and completion behavior belong to the playback recipe.
Visual Timing view
Switch Visual Layers from Layers to Timing to compare every layer against the same Reveal, Active, and Hide lifecycle used by Live Preview. Scrub the shared playhead, drag a bar to shift its start, and drag a finite end handle to change playback speed. Continuous and nested lanes remain visibly distinct so timing can be reviewed without opening each layer card.
Adjacent enabled phases join without gaps or playback restarts. Reveal Blend appears only on lanes that participate in the Reveal-to-Active transition, keeps its full authored duration when it crosses into Active, follows layers shifted into Reveal, and does not fade in a layer that begins later inside Active.
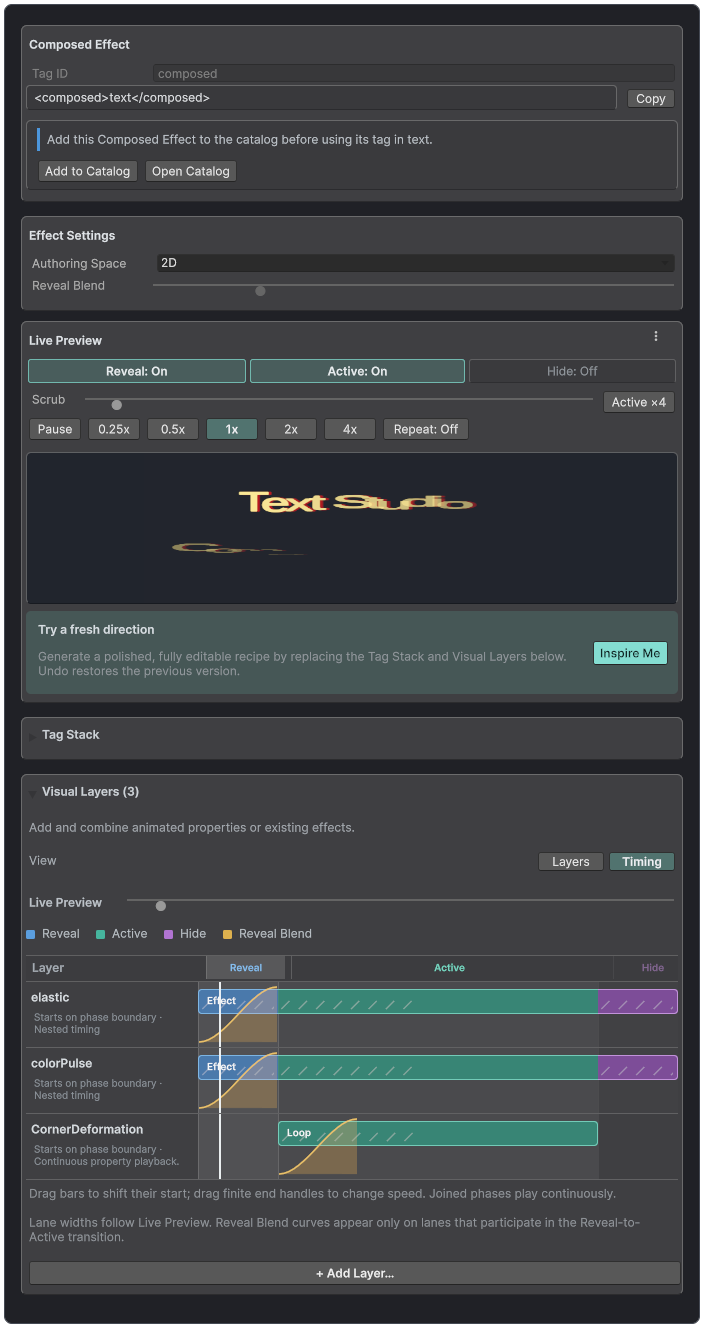
The Timing view aligns every visual layer to Live Preview and exposes phase shifts, finite playback length, joined phases, nested timing, and Reveal Blend.
Reveal, Active, and Hide preview choices are remembered for the project when you move between Composed Effects. Keep one comparison view active while tuning a family of dialogue, reward, or warning recipes, then switch phases deliberately when the design question changes.
Area, grouping, and sequence per layer
Each layer can target Glyph, Word, Line, Paragraph, or Range and can combine consecutive units with Group Size. Forward, Reverse, Center Out, Edges In, All At Once, and Seeded Random then determine progression. A nested effect can keep its own default area, but the parent layer may deliberately override it for the composed treatment.
Example: Area = Word, Group Size = 1, Sequence = Center Out
Blend modes and source color selection
Additive contributions accumulate with the current channel. Multiply scales it. Override replaces it. Lerp interpolates between the current and requested value. For color, Set applies a new color, Multiply preserves underlying variation, and Alpha Only changes transparency without repainting the glyph.
Source Color selectors evaluate the immutable original glyph color before composed color layers accumulate. Select by Hue, Saturation, Perceptual Luminance, or Alpha, then tune tolerance, softness, and inversion. This makes it possible to animate only the bright part of a gradient title or a package-authored color region while preserving the rest.
Spatial influence fields
Area and spatial influence answer different questions. Area decides which semantic units receive a layer, such as every glyph, each word, one authored range, or the whole line. A spatial field then calculates a 0 to 1 strength for each accepted glyph from its position. The effect still owns what changes; the field only controls where that change is strongest.
- Linear creates a directional ramp along X, Y, or Z where that axis is available.
- Sphere creates radial influence around a center. Box creates an axis-aligned volume with controllable falloff.
- Cylinder creates a radial band around an axis. Torus creates a ring-shaped volume.
- Target Distance measures every glyph against the Shared Spatial Target. Noise adds deterministic, repeatable variation rather than frame-to-frame randomness.
Choose the coordinate space deliberately
- Source Layout uses the original local text layout before placement. Use it when influence should stay attached to the authored line.
- Source Text Normalized maps the original visible bounds to a stable 0 to 1 rectangle. Use it for reusable left-to-right, bottom-to-top, or focal treatments that should survive a different font size or line width.
- Placed Text evaluates after the active placement has moved glyphs. Use it when the field should follow an arc, circle, wave, grid, spline, or spatial form.
- World evaluates placed glyph centers in world coordinates. Use it when the effect should react to a location shared with the scene.
Build a field stack
Each field provides shape, center, size or radius, strength, falloff, and optional inversion. Multiply gates the current influence, Add accumulates another contribution, Maximum keeps the strongest contribution, and Minimum keeps the weakest. A common readable recipe is a broad shape multiplied by subtle Noise: the shape provides intent while Noise prevents a mechanically uniform edge.
- Choose the Area first and confirm that the correct semantic range responds without any spatial field.
- Add one field in Source Layout or Source Text Normalized so its shape is easy to understand.
- Switch to Placed Text or World only when the treatment should follow placement or the scene.
- Add a second field only when its combine mode has a clear purpose, then test the falloff at the smallest final display size.
Interactive spatial preview
Target-aware effects expose an interactive target in the Composer. Auto Move demonstrates how influence travels and continues even when effect playback itself is paused. Dragging with the pointer, using the keyboard controls, or choosing Center switches the target to manual control so a specific boundary can be inspected.
The preview target is fitted to the preview framing only. It does not rewrite the field center, radius, falloff, world position, or the runtime Shared Spatial Target. Return to Auto Move when you want to judge continuity across the full field.
Surface masks and 2D or 3D authoring
A surface mask is meaningful only when the active renderer exposes semantic surfaces. TextMeshPro and UI Toolkit can use transform, color, alpha, corner deformation, and compatible material channels. Text Studio 3D additionally identifies Front, Front Relief, Front Bevel, Sides, Inner Sides, Back Bevel, Back, Edges, and Decorations, so one spatial layer can affect a deliberate part of the extrusion.
Choose a 2D Authoring Space for renderer-neutral effects. Choose 3D when the treatment intentionally uses Z position, full XYZ rotation, Z scale, extrusion surfaces, emission, metallic, smoothness, dissolve, depth scale, or another registered 3D channel. The base Composed Effect owns the data and Text Studio 3D supplies the extra capabilities. If the add-on is absent, Text Studio preserves the authored 3D values and reports the unavailable channels.
A surface mask narrows where a layer writes, while a spatial field varies how strongly it writes. They can work together. For example, a Sphere field can raise emission only on Front Relief, or a moving Target Distance field can dissolve Sides while leaving the readable Front untouched.
If a 2D Composed Effect contains a hidden Z position, X or Y rotation, or Z scale value, the layer identifies the exact incompatible value. Fix for 2D resets only that value. Switch Authoring Space to 3D when the depth was intentional.
Seven production recipes
- Reward pop: Reveal scale overshoot, short position lift, warm color Set, and a brief shimmer. Add a Reduced Motion version with color and alpha only.
- Dialogue emphasis: Word area, restrained Active pulse, Multiply color, and a short finite playback so the sentence becomes still.
- Warning signal: Range area, red color sweep, low-amplitude shake, and an event marker at the warning beat. Cap flashing frequency.
- Karaoke highlight: External playback drives a color sweep by progress. Use Source Color selection to preserve speaker styling and add a short release tail.
- Hologram title: Chromatic shift, alpha scan, UV motion, and an optional 3D surface mask. Keep text readable when material channels are unavailable.
- Four-corner deformation: Corner offsets, an intentional pivot, forward sequence, and bounded strength so counters and small text remain legible.
- Hide treatment: Fold or slide, alpha fade, reverse order, and a skip policy that settles to fully hidden without leaving an active layer.
Sharing and diagnostics
Copy Effect Code when a treatment must cross projects or packages. The payload records readable metadata, layers, stable IDs, and required dependencies. Import reports identity conflicts and preserves unavailable extension channels. Use Extract when reuse should remain inside the project as a normal asset reference.
- A layer appears late: inspect start delay, phase assignment, playback, phase shift, and sequence.
- A layer never appears: inspect Enabled, Solo state, Area range, influence, source-color selector, surface mask, and renderer support.
- The result pops after reveal: increase Reveal-to-Active Blend or align the two layers' final values.
- Two layers fight: inspect their evaluation order and whether the later layer uses Override or Lerp.
- The composition is expensive: isolate topology, material, and high-frequency layers, then reduce update frequency or move stable work into a preset.